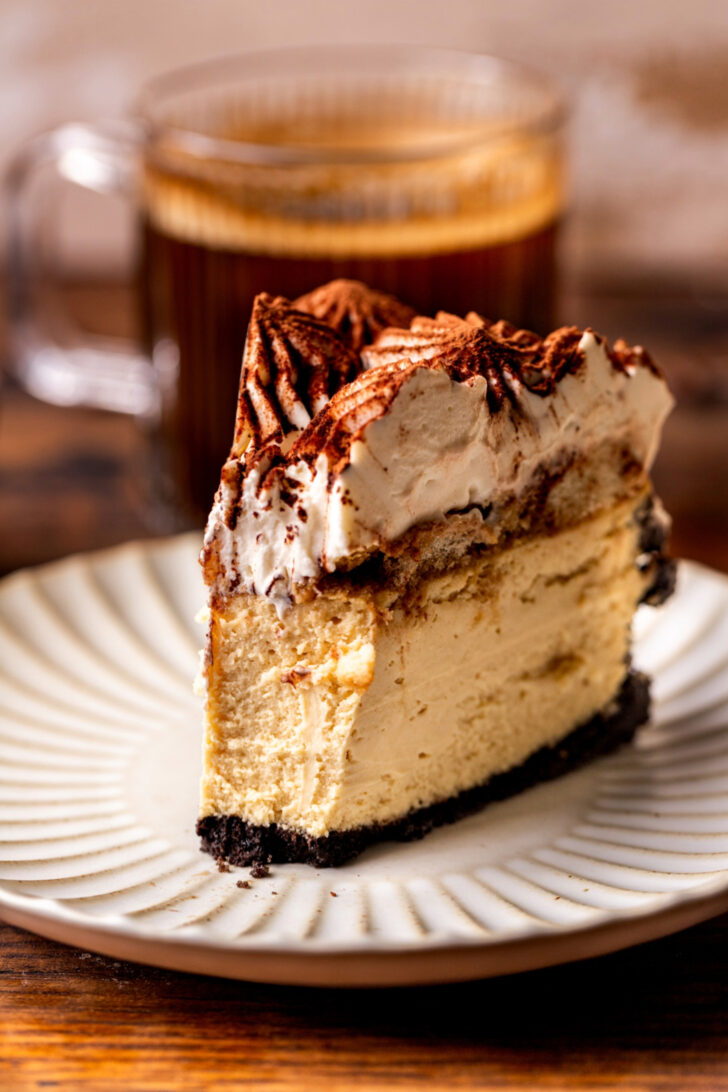
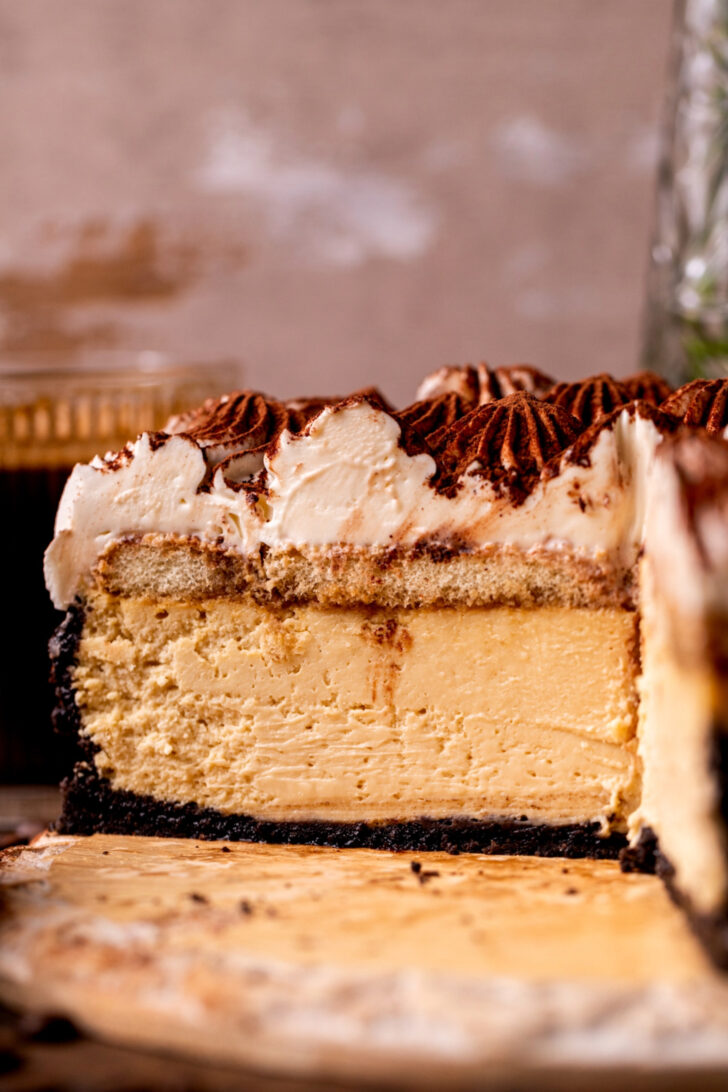
Tiramisu Cheesecake

This tiramisu cheesecake is for all the espresso lovers! It has an Oreo crust with a creamy brown sugar espresso cheesecake. It is topped with espresso soaked ladyfingers, whipped mascarpone cream and cocoa powder. This is an alcohol free tiramisu dessert.
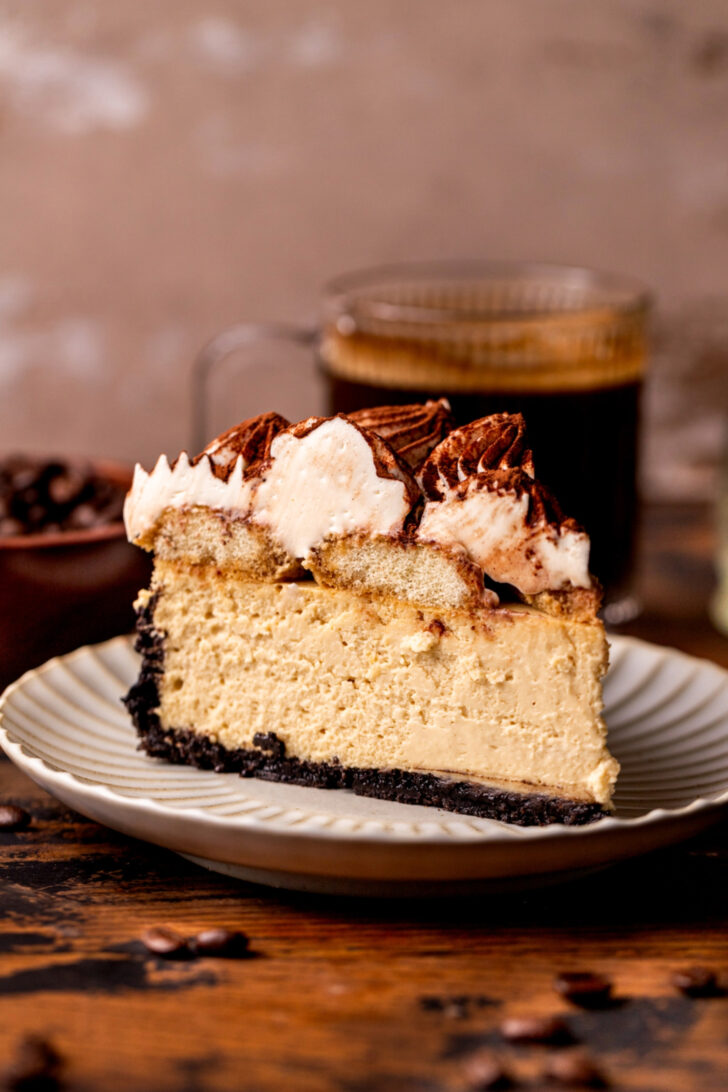
Tiramisu is a classic dessert that is creamy, delicious, and has a great espresso flavor. This cheesecake combines the decadent creamy goodness of cheesecake with the delicious flavors of tiramisu. It is the perfect way to wow your friends and family.
I have tips and tricks and process photos to easily help you make this recipe! If you love coffee desserts, you have to try my coffee cookies.

Tips for making the cheesecake
Here are my tips, so yours turns out like this recipe! See my mascarpone frosting for more tips on making the frosting.
- Tip 1: Make sure to use room temperature dairy ingredients. This will help them mix in easier and reduce lumps.
- Tip 2: Prepare your espresso beforehand. It needs to be made with hot water, but will need to cool down before it can be added to the cheesecake.
- Tip 3: Mix the eggs on low speed. Adding too much air to the eggs, can cause air bubbles to form. These air bubbles will rise and pop quickly in the cheesecake, which can cause cracks.
- Tip 4: Use a water bath. See below for my favorite water bath method. Water bath is necessary to keep the cheesecake moist. A dry cheesecake will cause cracks.
Assembling and Decorating
Save this Recipe!
For more cheesecake recipes, try my no bake chocolate cheesecake and new york style cheesecake.
Make sure to leave a star review if you loved this recipe! Make sure to tag me on Instagram @stephaniesweettreats. To get more ideas follow me on Pinterest.

Tiramisu Cheesecake
Ingredients
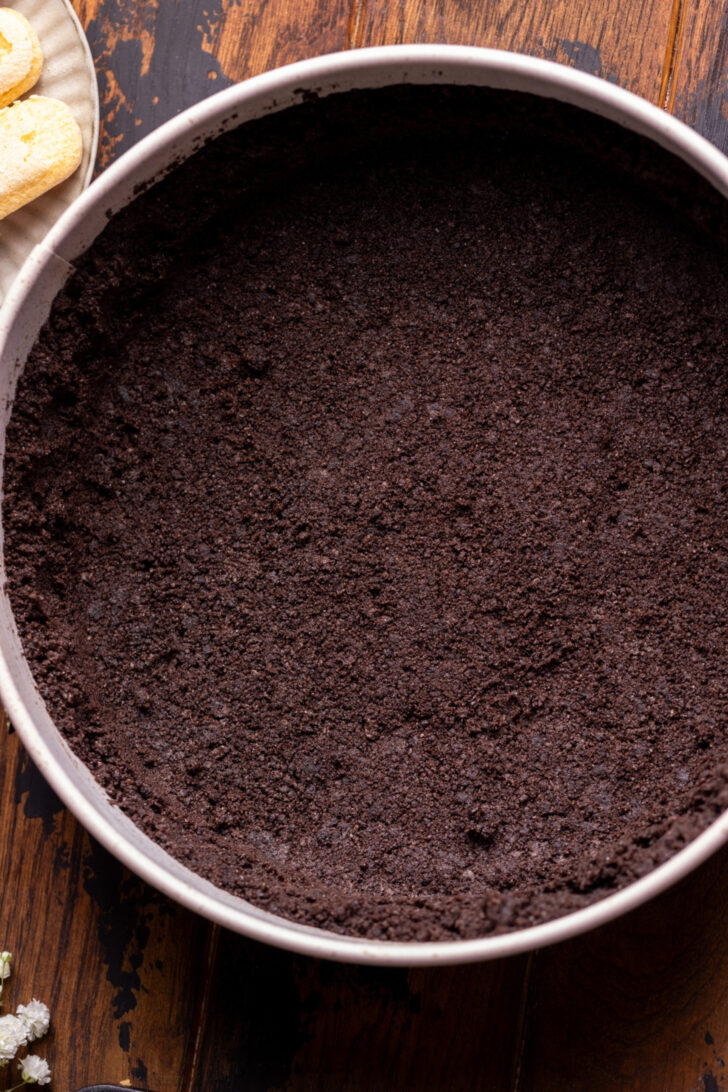
The Crust
- 3 cups Oreos, Fine crumb equal to 26 Oreos
- 5 TBSP Unsalted butter, melted
Espresso Cheesecake
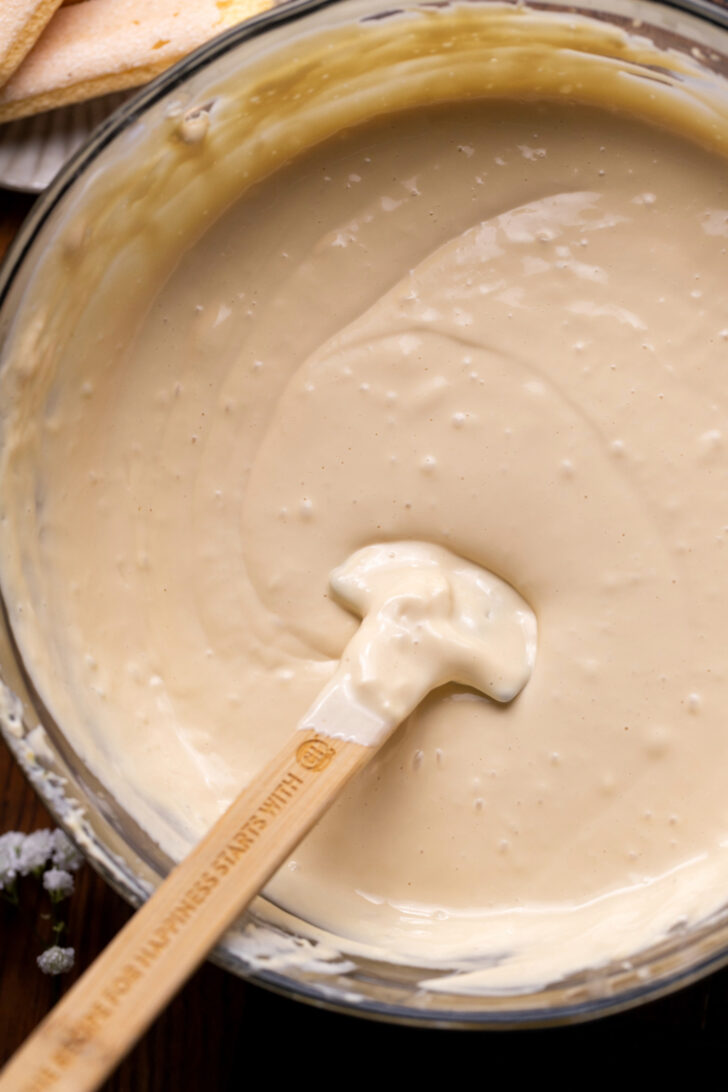
- 32 oz Cream cheese, room temperature
- 1 cup Brown sugar, packed light or dark
- 2 tsp Pure vanilla extract
- 3/4 cup Sour cream, room temperature
- 1/3 cup Prepared Espresso, room temperature 1/3 cup hot water and 1 tsp of espresso powder
- 4 Large eggs, room temperature
- 1 Egg yolk, room temperature
Whipped Mascarpone Cream
- 1 cup Prepared espresso
- 12 Ladyfingers
- 4 oz Mascarpone cheese, cold
- 1/2 cup Powdered sugar, sifted
- 1 tsp Pure vanilla extract
- 1 cup Heavy cream, cold
- 1/4 cup Cocoa powder, for dusting
Instructions
The Crust
- Preheat the oven to 325℉. Spray a 9-inch springform pan with baking spray. Line the bottom of the pan with a parchment paper circle. Spray again.
- Using a food processor, blend the Oreos into a fine crumb. In a small bowl, add the Oreo crumbs and melted butter. Mix with a fork until combined.3 cups Oreos, 5 TBSP Unsalted butter
- Pour the crumbs into the pan. Use your hands to press the crust halfway up the sides of the pan. Use the bottom of a measuring cup to compact the crust.
- Bake crust for 12 minutes.
Espresso Cheesecake
- Using a mixer, beat the cream cheese and brown sugar on high speed for 2 minutes.32 oz Cream cheese, 1 cup Brown sugar
- Scrape the bowl using a baking rubber spatula. Add in the sour cream, espresso, and vanilla. Mix on medium until combined.2 tsp Pure vanilla extract, 3/4 cup Sour cream, 1/3 cup Prepared Espresso
- Add in the eggs and egg yolk and mix on low speed until just combined. Scrape the bowl using the spatula.4 Large eggs, 1 Egg yolk
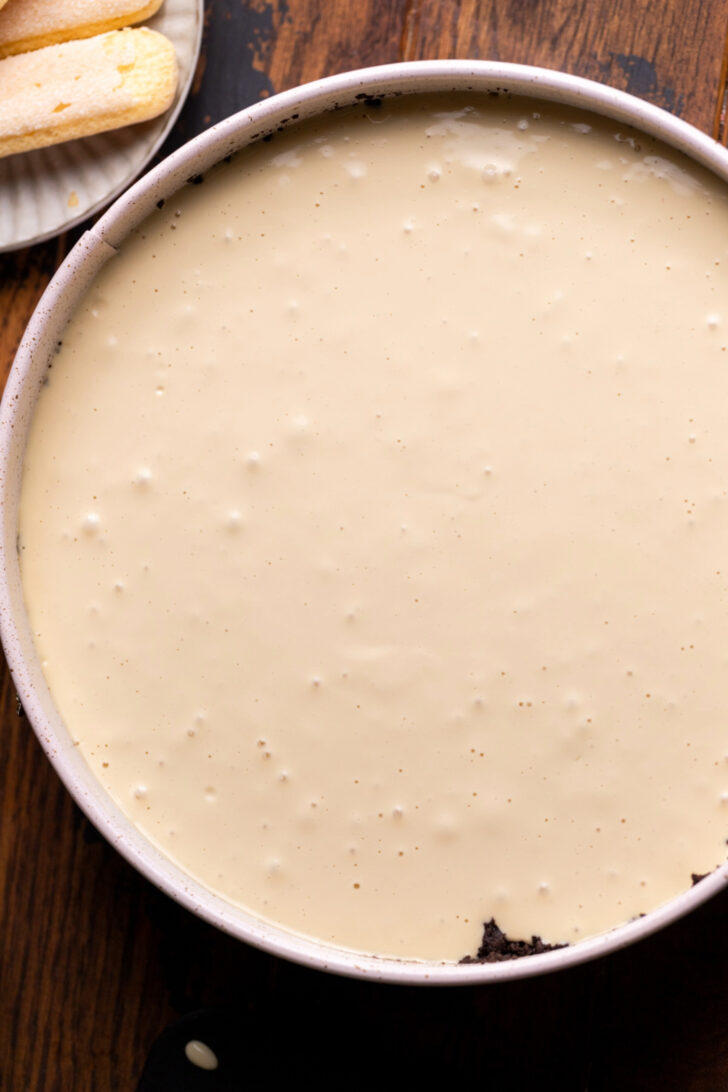
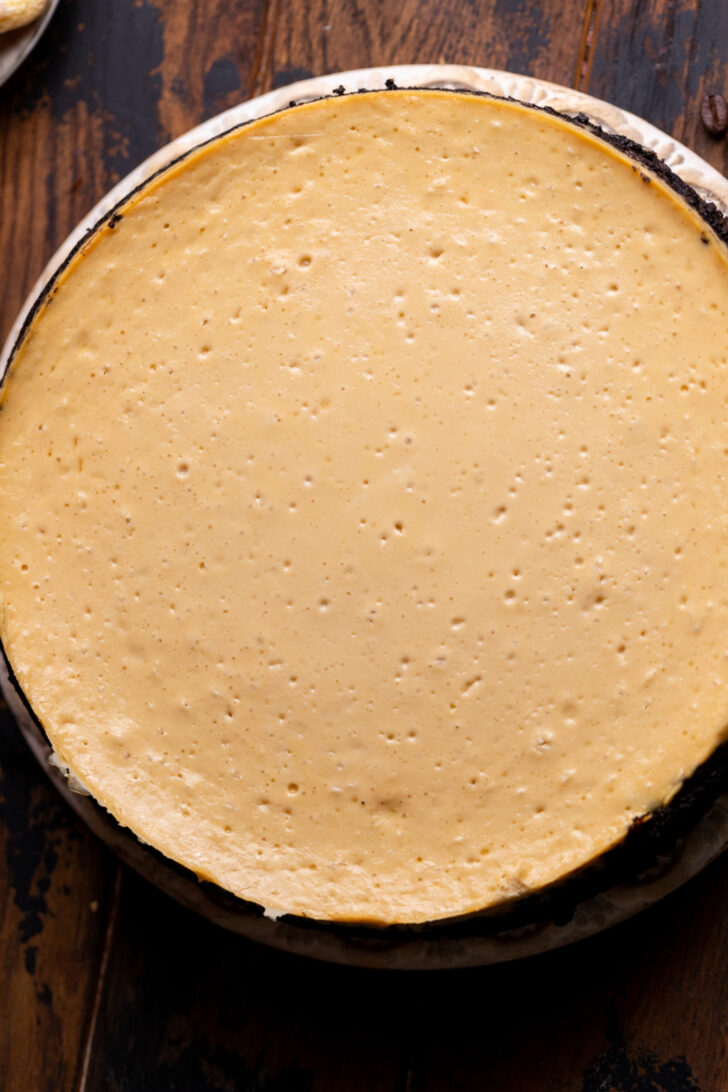
- Pour cheesecake batter into pan. Prepare a water bath.
- Water Bath Options:1. Place springform pan in a 10 inch cake pan. Place cake pan in a roasting pan. Fill the roasting pan up half way up the cake pan with hot steaming water.2. Wrap springform pan in foil tightly twice. Place pan in the roasting pan. Fill half way up with hot steaming water.
- Bake cheesecake for 80-90 minutes. The cheesecake is done baking when the edges are set and the middle has a slight jiggle. If it is too jiggly, then bake for another 5 minutes and check again.
- Turn off the oven, crack open the door and let the cheesecake slowly cool for 30 minutes. Take cheesecake out of the oven and place on a wire rack. Let it cool completely before covering and chilling in the fridge for 6 hours or overnight.
Whipped Mascarpone Cream
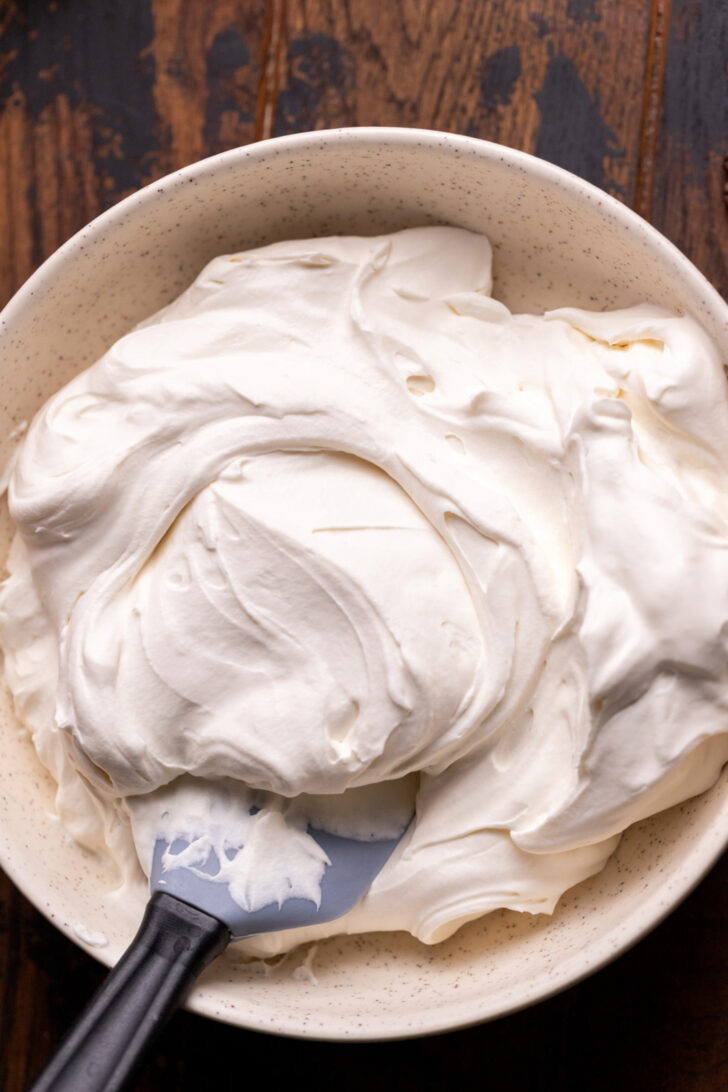
- Using a hand mixer, beat the mascarpone (make sure it is cold so it won't split) and powdered sugar on smooth.4 oz Mascarpone cheese, 1/2 cup Powdered sugar
- Using a mixer, a metal bowl, and a whisk attachment, beat the heavy cream and vanilla on high speed until soft peaks form.1 cup Heavy cream, 1 tsp Pure vanilla extract
- Add in the mascarpone and beat on high until stiff peaks form. Set aside.
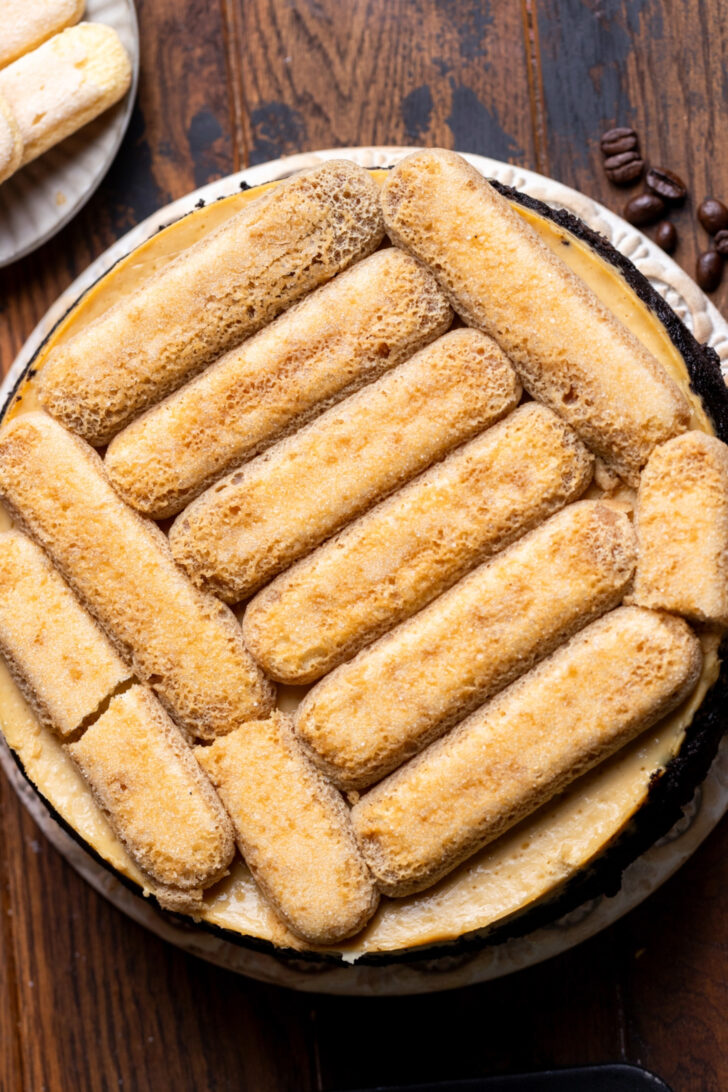
- Remove the cheesecake out of the pan and remove the parchment paper. Soak the lady fingers in the espresso and place on top of the cheesecake. Some of them will need to cut so it fills the whole cheesecake.1 cup Prepared espresso, 12 Ladyfingers
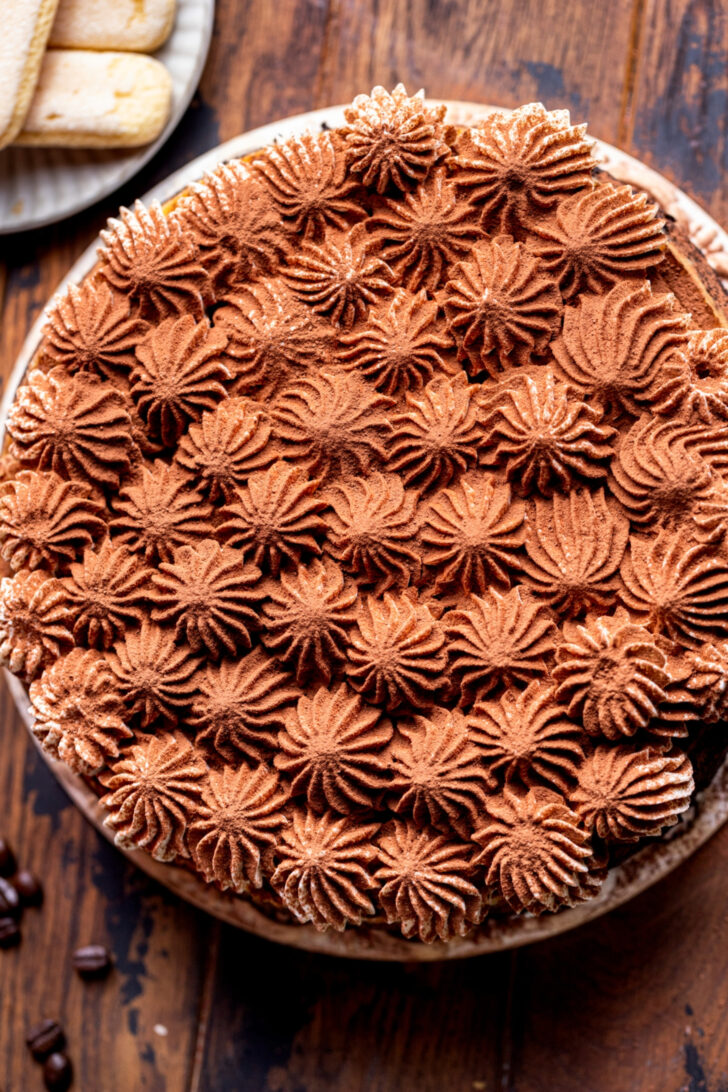
- Pipe circles of the cream on top of the lady fingers. Place the cocoa powder in the mesh sieve to dust it on top of the cream. Keep the cheesecake cold before serving.1/4 cup Cocoa powder
Thank you for sharing this recipe
This was PHENOMENAL! I made it for my husband’s birthday and every single person that tried it raves about it. I am gluten free so I swapped in gluten free Oreos for the crust. I had trouble finding GF ladyfingers so I used GF vanilla wafers mixed in with Oreos for the crust and it worked perfectly. I eventually found the GF ladyfingers and used them for the coffee soaked top layer. Will definitely make this again!
This was exactly the recipe I was looking for – all the flavors of tiramisu without having to worry about raw eggs. I made it for Father’s Day for my husband. It is probably one of if not the best cheesecake I have ever had. I will definitely make it again.
I did make a few changes based on previous cheesecake baking. 1 – I subbed 8oz mascarpone for 1 of the cream cheese blocks. 2 – I left the finished cheesecake in the oven for a full hour with the door cracked. 3 – I wanted to make sure the entire top was covered with ladyfingers so I cut a few in half so I could get all the edges.
Do bake the cheesecake at 325 for the whole time?
Yes it does.
Made this for a foodie and coffee fiend friend for his birthday. It wasn’t as pretty as yours but it was delicious…I believe I heard the word amazing more than once 😁
Can I make this into mini’s? Would I need to change any measurements or this is fine as is? Looking to make this tomorrow I’m excited!
I would divide the recipe into thirds to make 12 mini cheesecakes.
This cheesecake is incredible! It tastes just like tiramisu!
I used my own cheesecake recipe but everything about this is on point. Absolutely delicious with step by step direction. Love this page!!
This looks absolutely delicious! I can’t wait to make it! What size/brand food processor would you recommend? Do you think it would be possible to bake this in a Pyrex pie plate instead of the springform pan in a pinch?
You can honestly use any brand. It just needs to blend the Oreos and ladyfingers. Also, I don’t recommend using a pie pan. You will definitely need a springform pan if it is going to bake right.
My daughter requested a Tiramisu Cheesecake for her birthday and she shared this recipe with me. It was so delicious! Everything from the crisp tasty crust, the espresso infused creamy cheesecake, to the lady finger and whipped cream cheese topping was divine! I was a bit intimidated by the many steps but she did an excellent job detailing each step. It was a big hit!
Im so glad you loved this recipe!
I absolutely love this cheesecake! It is perfect, creamy, and delicious. I can not recommend it enough!
Pingback: Easy Creamy Nutella Cheesecake - Stephanies Sweet Treats