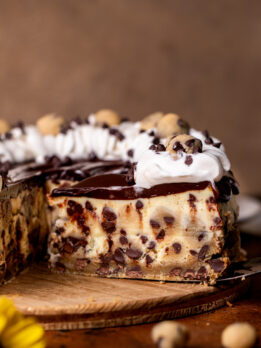
Cookie Dough Cheesecake
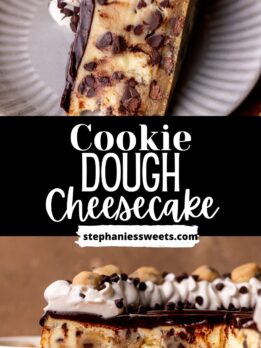
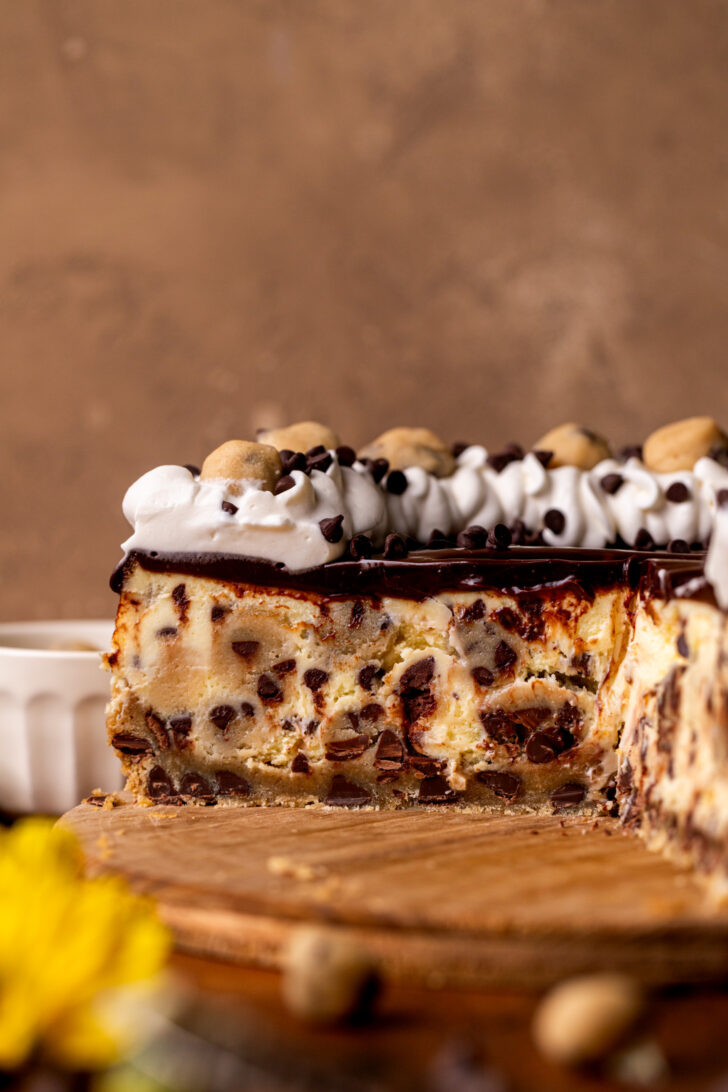
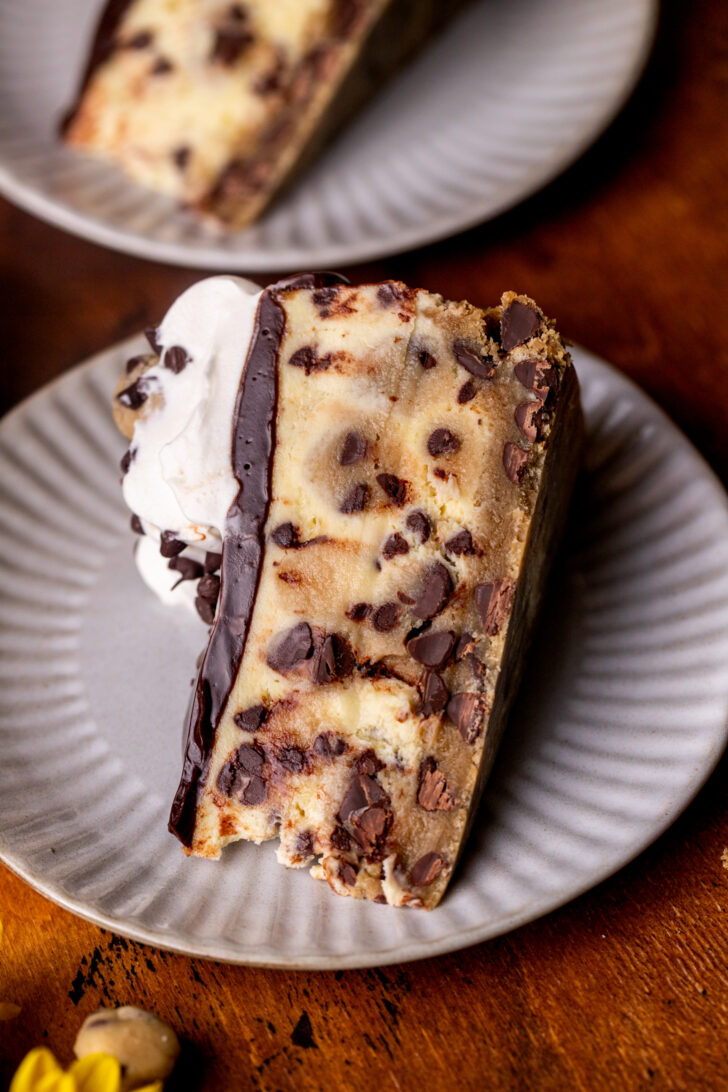
This is the ultimate chocolate chip cookie dough cheesecake. It has a chocolate chip cookie crust, cookie dough baked in a chocolate chip cheesecake, and it’s topped with chocolate and more edible cookie dough. If you are a cheesecake lover or a cookie dough lover, you are going to love this cheesecake!

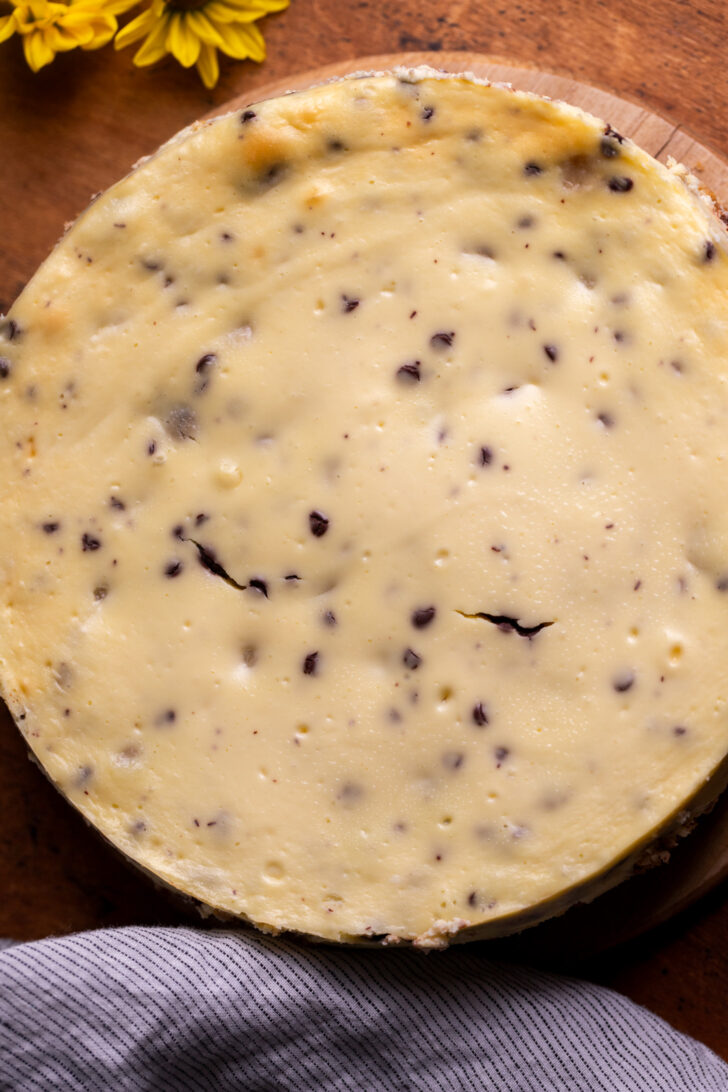
This chocolate chip cookie dough cheesecake is the BEST cookie dough cheesecake. Besides the cookie crust, the best part of this cheesecake is the cookie dough balls baked inside. The cookie dough balls are frozen, so they stay in the cookie dough form after it bakes. It is SO good.
For more information on making edible cookie dough check out my edible cookie dough recipe!
I have tips and tricks and process photos to easily help you make this recipe! If you love cookie dough desserts, you have to try my cookie dough cheesecake bars.
Tips for making the cheesecake
Here are my tips, so yours turns out like this recipe!
- Tip 1: Make sure to properly measure the flour for the crust and cookie dough balls. You need to spoon and level the flour, if you stick the measuring cup straight into the flour it will compact it. It will result in dry crust and cookie dough.
- Tip 2: Start with the crust. Make the crust first since it bakes for 18 minutes, while it bakes you can make the cookie dough balls.
- Tip 3: Each cookie dough ball is around 1 1/2 teaspoons. I just eyeballed it so there is some varying sizes.
- Tip 4: Mix the eggs on low speed. Adding too much air to the eggs, can cause air bubbles to form. These air bubbles will rise and pop quickly in the cheesecake, which can cause cracks.
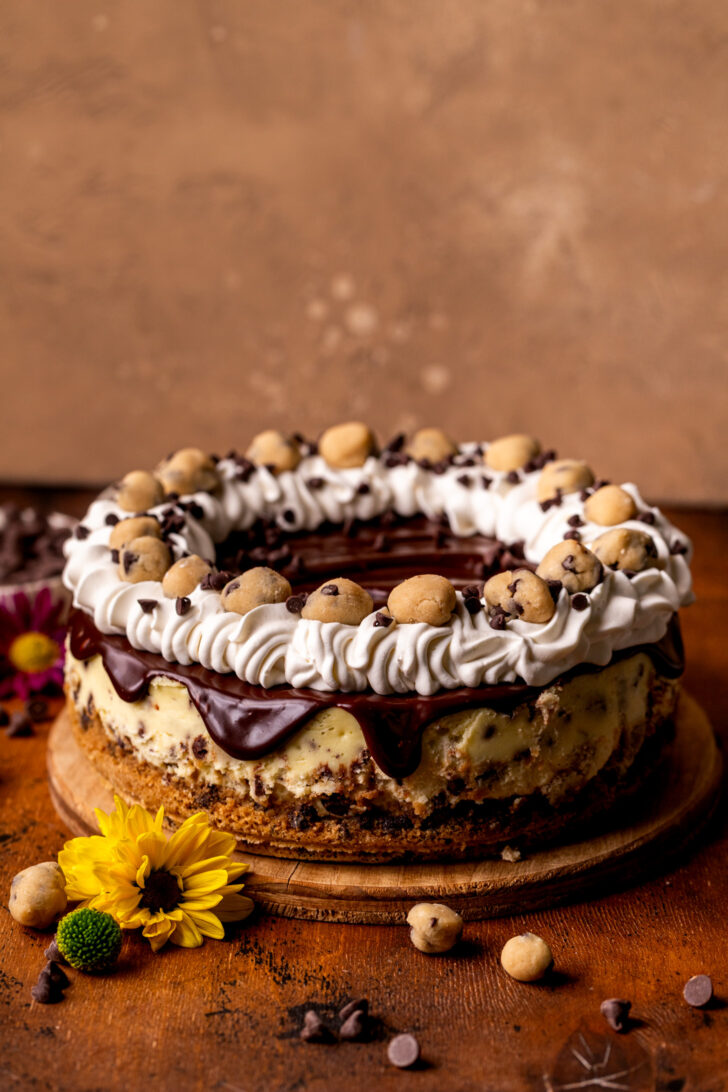
How to decorate the cheesecake
Save this Recipe!
For more cookie dough recipes, try my cookie dough cookies and cookie dough cake.

Make sure to leave a star review if you loved this recipe! Make sure to tag me on Instagram @stephaniesweettreats. To get more ideas follow me on Pinterest.
Recipe Video
Chocolate Chip Cookie Dough Cheesecake
Ingredients
Chocolate Chip Cookie Crust
- 1 1/4 cup All-purpose flour
- 1/2 tsp Baking soda
- 1/2 tsp Salt
- 1/2 cup Unsalted butter, room temperature
- 1/2 cup Brown sugar, packed light or dark
- 1/4 cup White granulated sugar
- 1/2 tsp Pure vanilla extract
- 1 Large egg, room temperature
- 1 cup Semi-sweet chocolate chips
Edible Cookie Dough
- 1 1/2 cup All-purpose flour, heat treated see notes
- 1/4 tsp Salt
- 1/2 cup Unsalted butter, room temperature
- 1/2 cup Brown sugar , packed light or dark
- 1/2 cup White granulated sugar
- 1 tsp Pure vanilla extract
- 3 TBSP Milk
- 1/2 cup Semi-sweet chocolate chips
- 1/2 cup Mini chocolate chips
Chocolate Chip Cheesecake
- 24 oz Cream cheese, room temperature
- 3/4 cup White granulated sugar
- 1/2 cup Sour cream, room temperature
- 1/4 cup Heavy whipping cream, room temperature
- 1 tsp Pure vanilla extract
- 3 Large eggs, room temperature
- 3/4 cup Mini chocolate chips
- 2/3 Cookie dough balls
Chocolate Ganache
- 1 cup Semi-sweet chocolate chips
- 1/2 cup Heavy whipping cream
Whipped Cream
- 1 cup Heavy whipping cream
- 2 TBSP Powdered sugar
- 1/2 tsp Pure vanilla extract
Instructions
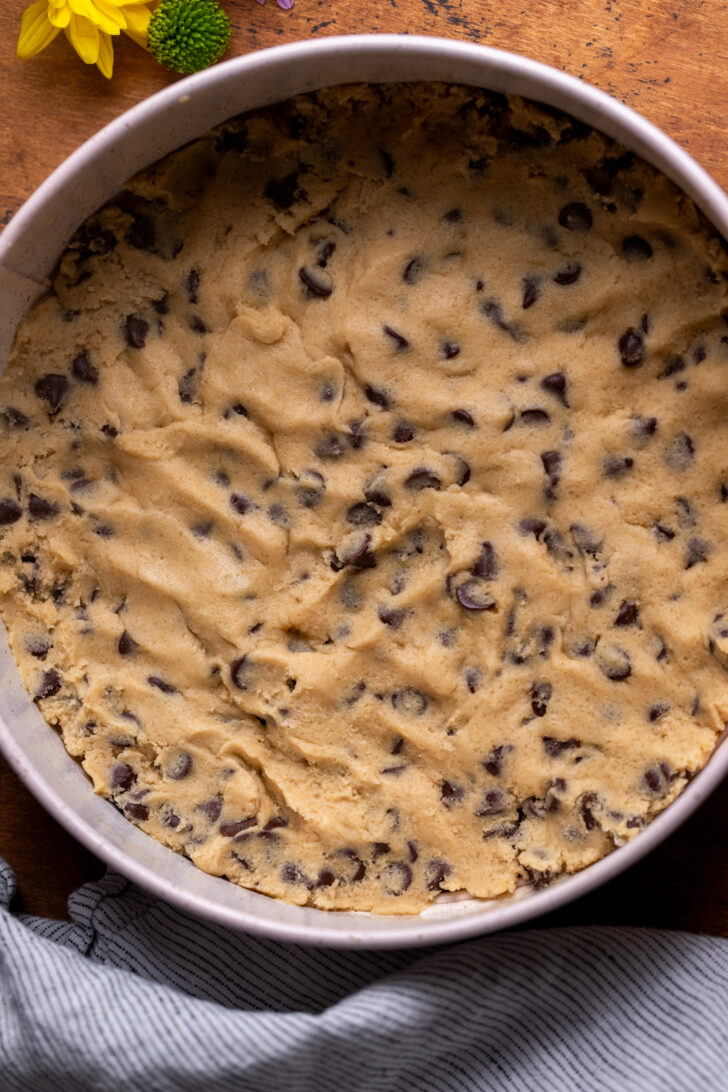
Chocolate Chip Cookie Crust
- Preheat oven to 350°F. Spray a 9 inch spring form pan with non-stick baking spray. Place a 9 inch parchment circle on the bottom of the pan and spray again.
- In a medium bowl, sift together flour, baking soda, and salt. Set aside.1 1/4 cup All-purpose flour, 1/2 tsp Baking soda, 1/2 tsp Salt
- Use a mixer and beat the butter, brown sugar, and white sugar together for 2 minutes. The butter should be light and fluffy. Add in the vanilla and egg. Mix until combined.1/2 cup Unsalted butter, 1/2 cup Brown sugar, 1/4 cup White granulated sugar, 1/2 tsp Pure vanilla extract, 1 Large egg
- Slowly add in the dry ingredients. Add in chocolate chips and mix until all combined.1 cup Semi-sweet chocolate chips
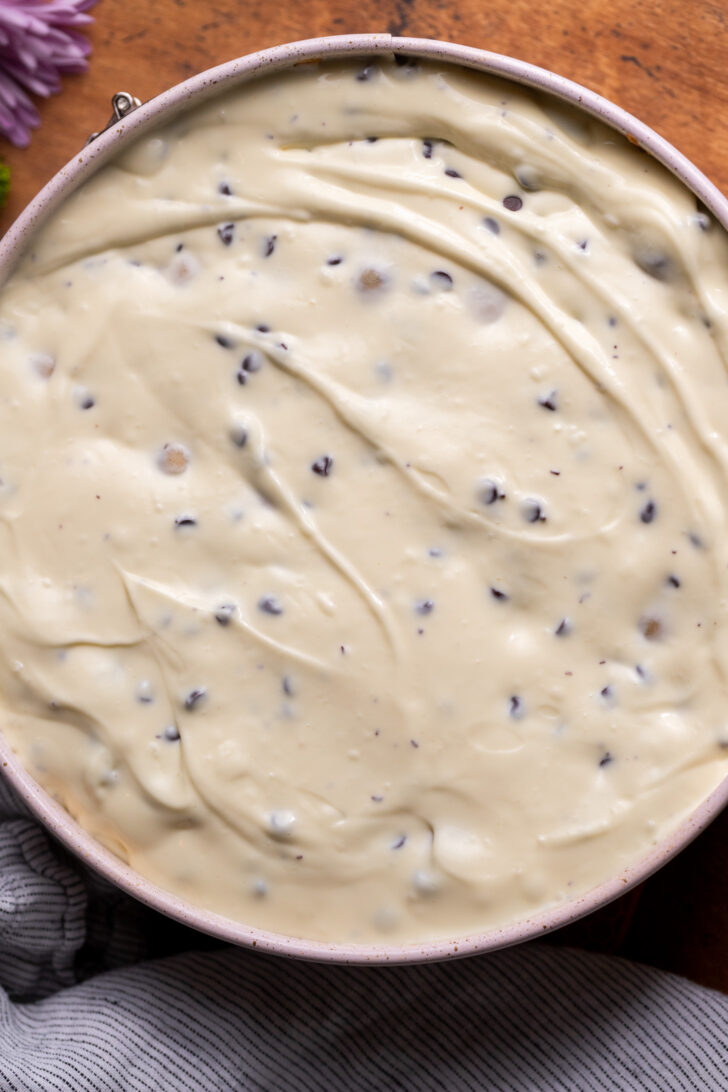
- Pour all of the cookie dough into the pan. Compact the cookie dough on the bottom.
- Bake for 18-23 minutes. The crust should be golden brown.
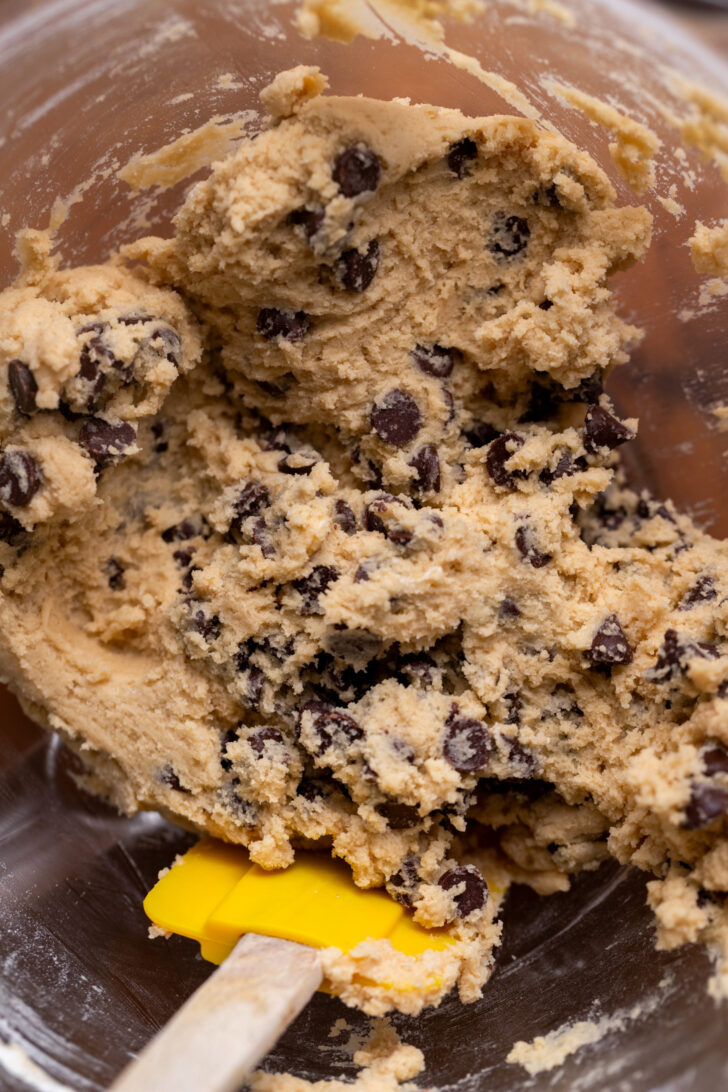
Edible Cookie Dough
- White the crust is cooking, start on the edible cookie dough. In a medium bowl, sift the flour and salt together. Set aside.1 1/2 cup All-purpose flour, 1/4 tsp Salt
- Using a mixer, beat the butter, brown sugar, and white sugar together for 2 minutes on medium. The butter should be fluffy. Add in the vanilla and milk.1/2 cup Unsalted butter, 1/2 cup Brown sugar , 1/2 cup White granulated sugar, 1 tsp Pure vanilla extract, 3 TBSP Milk
- Slowly add in the dry ingredients, once combined, scrape the bowl. Then, add in both chocolate chips. Mix again until combined.1/2 cup Semi-sweet chocolate chips, 1/2 cup Mini chocolate chips
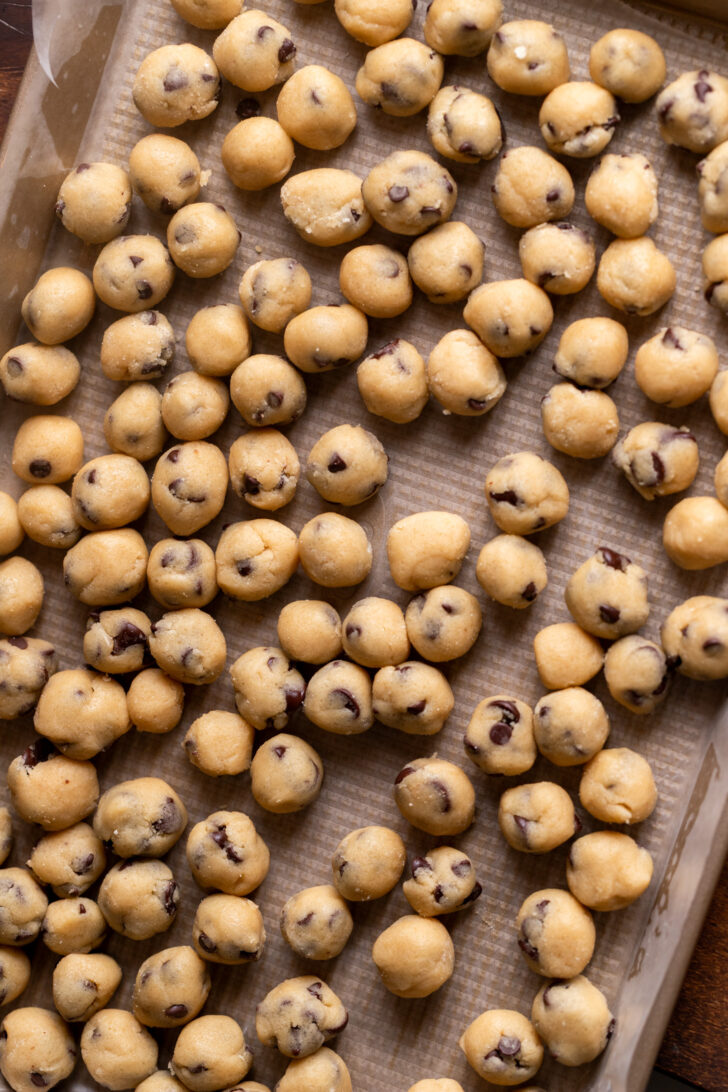
- Grab a cookie sheet and top with parchment paper. Take a tiny amount of dough and roll it into a ball. The size should be the size of chick peas to the size of large blueberries. This will make a lot of cookie dough balls.
- Place cookie sheet with cookie dough balls in the freezer until ready to add into the cheesecake. The cookie dough should be very firm. It should be at least 15 minutes in the freezer.
Chocolate Chip Cheesecake
- Once the cookie crust is done baking, allow it to slightly cool while making cheesecake batter. Lower the heat to 325°F.
- Using a mixer, beat the cream cheese on high for 1 minute. Scrape the bowl. The cream cheese should be fluffy. Add in the sugar and beat again on high for 1 minute. Scrape the bowl. There should be no large chunks of cream cheese left.24 oz Cream cheese, 3/4 cup White granulated sugar
- Add in the vanilla, sour cream, and heavy cream. Mix on low until combined, then turn to medium-high and beat for 30 seconds. It should be creamy with no chunks of cream cheese. Scrape the bowl. If there are cream cheese chunks beat again for 30 seconds.1/2 cup Sour cream, 1/4 cup Heavy whipping cream, 1 tsp Pure vanilla extract
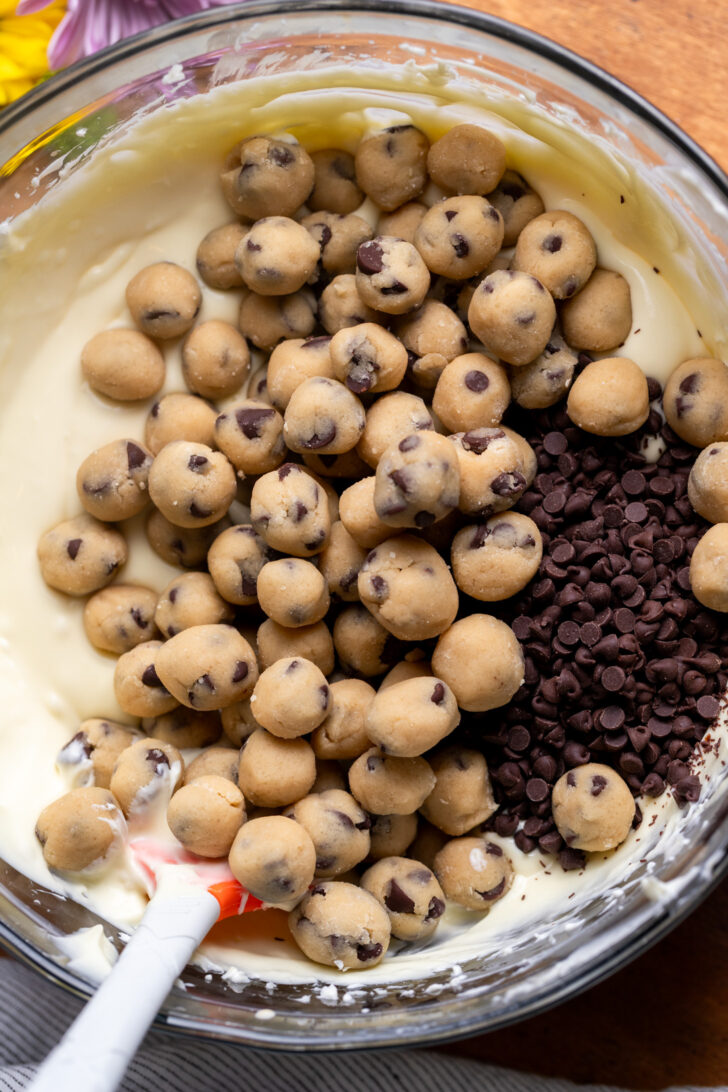
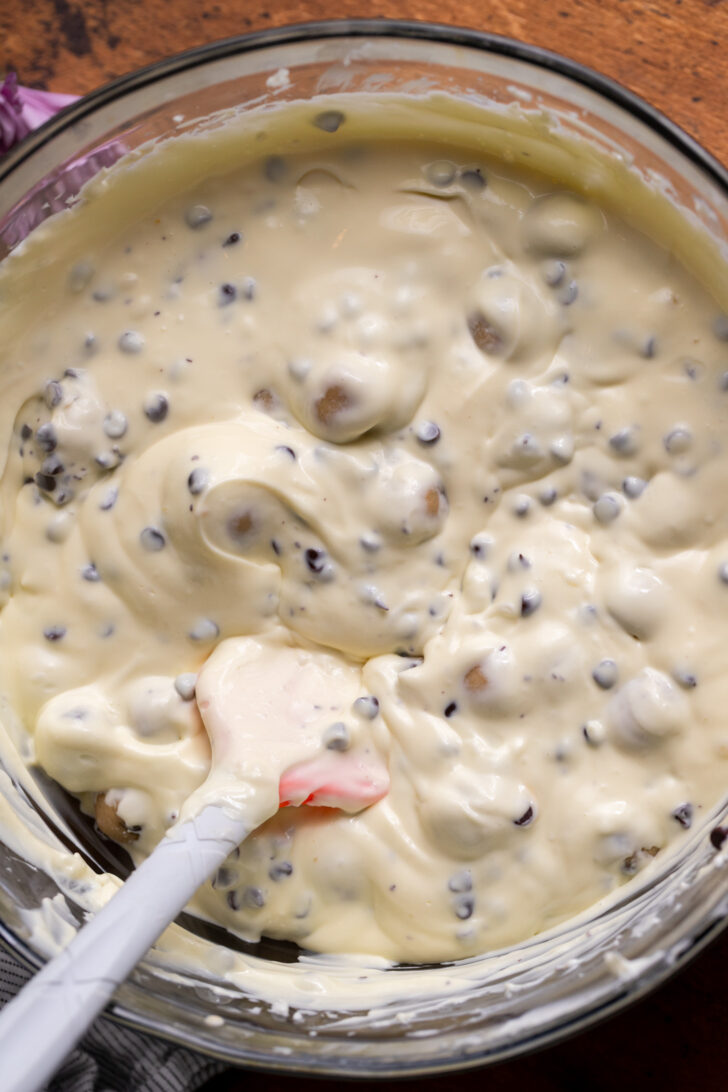
- Add in the eggs one at a time on low. Mix until just combined. Scrape the bowl one more time and mix for 10 more seconds. Add in the mini chocolate chips and 2/3rds of the frozen cookie dough balls. Since it is frozen, it will remain as cookie dough as it bakes. Use a rubber spatula to gently stir it together.3/4 cup Mini chocolate chips, 2/3 Cookie dough balls, 3 Large eggs
- Water Bath. Use one of the two methods. Both methods will need hot steaming water and a roasting pan. 1. My favorite. Use a 10 inch cake pan and place the springform pan inside the cake pan. Then, put the cake pan in the roasting pan and fill roasting pan with hot water about halfway up the cake pan.. 2. Cover spring form pan 2 times with aluminum foil to prevent water getting into pan. Then, fill roasting pan with hot water and place spring form pan in the water.
- Bake for 75-90 minutes. The cheesecake should be light golden brown on the edges with no cracks. The cheesecake is done baking when there is a slight jiggle in the middle and the edges are set. Prop oven door open and turn off the oven. Let cheesecake slowly cool in oven for 30 minutes.
- Take cheesecake out of water bath and transfer to a cooling rack. Allow the cheesecake to cool completely before wrapping in aluminum foil and storing in the fridge. Cheesecake needs to cool for at least 6 hours or overnight.
Chocolate Ganache
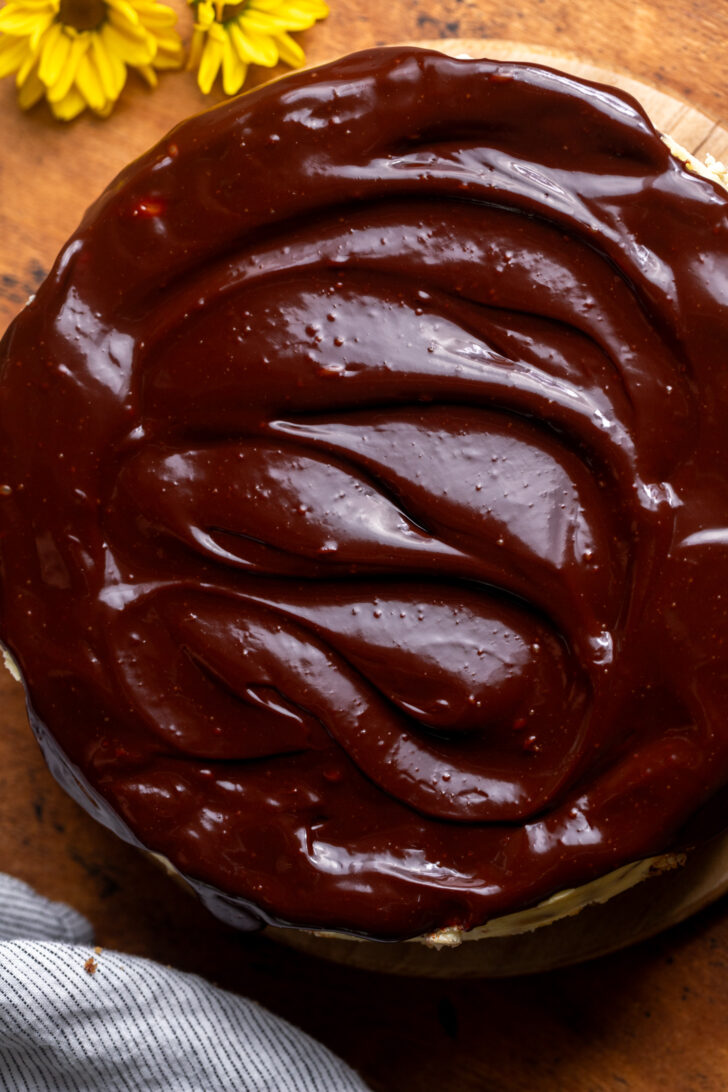
- Take the pan off the cheesecake and remove the parchment circle. Pour chocolate chips in a small bowl. Take the cookie dough balls out of the freezer and place on the counter.1 cup Semi-sweet chocolate chips
- Use a saucepan on medium-low heat the heavy cream until hot and steaming. Pour heavy cream on top of chocolate chip and let it sit for 1 minute and 30 seconds. Then, use a rubber spatula to stir until ganache is smooth and silky.1/2 cup Heavy whipping cream
- If there is still chocolate chunks remaining, then heat in microwave for 10 second intervals until melted. If the chocolate gets too hot, let cool for 5 minutes before using.
- Pour the ganache into the middle of the cheesecake. Use an icing spatula to smooth the ganache.
- Place in the fridge for 10 minutes for the ganache to set.
Whipped Cream
- While the ganache is chilling, place a metal mixing bowl and whisk attachment in the freezer for 10 minutes.
- Using a mixer, beat heavy cream, powdered sugar, and vanilla on high until stiff peaks form.1 cup Heavy whipping cream, 2 TBSP Powdered sugar, 1/2 tsp Pure vanilla extract
- Pipe whipped cream on the cheesecake. Top with cookie dough balls and mini chocolate chips.
This worked exactly as written, thanks!
My 19 year old son asked for a cookie dough cheesecake for his birthday. I made this one. He said ot was better than the Cheesecake Factory version! Everyone loved it. It’s just sweet enough. Thank you!
Phenomenal recipe! So decadent and delicious. The instructions are super easy to follow too!
What a great recipe, thanks so much for sharing it! Made this for my daughter’s birthday, it’s really good, crazy sweet, everyone loved it! Only change was making ganache with 1:1 ratio instead of double chocolate to cream, I read one post mentioning the topping was hard, standard ganache stays softer. Looking forward to trying more of your recipes! Oh, and your notes don’t include instructions for treating the flour, I found it in the comments.
I made this for my daughter’s birthday last year and everybody loved it! I am planning to make it again this year! So good!
There isn’t a note for the hear treated flour and didn’t do it for my cookie balls, will it be okay for the ones in the cheesecake since they will be cooking anyway and maybe leave the ones on top out of the decorations?
Can you put the cookie dough base in raw rather than prebaking it? Seems like since it bakes over an hour, that would be long enough to cook it even under the cheesecake. It just seems like it would be way overdone if it’s already baked and then you cook it 70-90 minutes more. Does it not? Just want to make sure I do it right and be able to enjoy the base too. Tips appreciated!
It doesn’t get overbaked because of all the moisture from the cheesecake. You want to prebake it, otherwise it would be underdone.
Sounds good, thanks!!
i made this last Easter and it was delicious and looked beautiful! Can the cookie dough and cheesecake be made in advance and frozen, then thawed and add the toppings?
The cheesecake is in the oven, I have 1 concern it filled my 9 in spring form pan to the top. I pray it doesn’t spill over as its cooking. Did I do something wrong.
Is the mini chocolate chips semi-sweet? My store doesn’t have mini milk chocolate chips.
They are semi-sweet.
This looks amazing! Can you make the edible cookie dough ahead of time and freeze them overnight and then make the cheesecake the next day, or will this add too much moisture to the dough.
This for sure is a cookie dough cheesecake recipe!! Honestly, the cookie dough balls were a little time consuming because it’s meticulous having to make so many that are so small, and my husband felt like they weren’t really needed because the chocolate chips throughout and the cookie bottom was plenty sweet. We still really enjoyed it though, forget Cheesecake Factory!!
Hello! I plan on making this next week! It looks amazing. I see that it says to make 1 day ahead. Is 3-4 days ahead too much? Do you prepare the entire cheesecake ahead or should I leave off the ganache until closer?
Thank you!
My favorite recipe of all time and it got me into making cheesecakes! I’m wondering, is it possible to make mini cheesecakes out of these recipe?
Where are the notes about cooking the flour for the edible cookie dough? I can’t seem to find them.
Preheat the oven to 300F. Line your cookie sheet with the flour and bake for 8 minutes and cool completely before using.
I made this for my son’s birthday and it was a hit! I am baking it again today, can’t wait to eat it tomorrow! Great recipe!!!!
Very good cheesecake. My only issue, which still didn’t slow us down from devouring this thing, was the chocolate topping made such a hard shell that it was hard to cut. I’m sure it was my error, any tips or suggestions on how to remedy or be able to cut more easily?
I love to make cheesecake! My family and friends always come up with new ideas for me and I do a great deal of research on recipes. When my daughter requested a cookie dough cheesecake I found this one and am I so happy I did! This cheesecake is definitely worth all the work. The directions are easy to follow and the outcome is the most decadent chocolate chip cookie dough cheesecake imaginable. If you love chocolate chip this is the recipe for you. I wish I could give more than 5 stars. I will be making this again.
I have made a lot of cheesecakes in my day, but this was my favorite, and it is my son’s new favorite!
I changed up a couple of things. I used gluten-free flour, and you couldn’t even tell a difference. I also was out of heavy cream, so I subbed in sweetened condensed milk and left off the whipped cream layer. Wowza. It was amazing!
This cake was a lot of work, but it was well worth it b/c it was probably the best cheesecake I’ve ever made. And it was such a hit for my partner’s birthday! I can’t wait to make it again.
Hi Stephanie’s Sweets! Just wanted to take a minute to thank you for posting an amazing recipe! I followed this recipe to a T and it came out exactly how it was supposed to. I’ve made so many online recipes that don’t come out at all like they’re supposed to, but this is a true beauty! I took pictures to show, hopefully I can post them here.
I used a 6 inch instant pot spring form pan. Layered approximately half an inch for the cookie dough crust and baked. Then instead of mixing the cookie dough bites into the batter, I sprinkled them over the crust, added enough batter to cover, sprinkled more bites, and filled with batteries almost to the top. After making the 6in cake, I used the leftover portions to make personal cupcake-sized cheesecakes using silicon molds, some with the cookie crust and some without. EVERYTHING turned out deliciously even though I just eyeballed the bake time. Seemed very forgiving.
This cheesecake is so good! I made a few modifications. I made the cheesecake but did not put the toppings on. I let it cool, wrapped in about 4 pieces of Saran Wrap and 4 pieces of tinfoil. I froze it for a couple of days. I thawed it for 2 hours. I then put the gnocchi on top. Then I piped on eggless cookie dough icing. I spaced them out kind of like the icing on cupcakes and topped each one with a mini chips ahoy cookie. I did not use whipping cream as a topping.
I made this for my best friends birthday. It was the hit of the party.
This was a fantastic recipe. I made it for my boyfriend’s birthday cake & it is a hit. The only change I made was I used a 13×9 inch baking dish to accommodate the family.
I am the baker in the family, but I’m currently recovering from surgery on my hand (of all things). We are celebrating Christmas on Sunday!! So, my oldest daughter and I spent all day making your chocolate chip cookie dough cheesecake! We had SO much fun! The cheesecake is currently chillin’ in the frig; we plan on finishing tomorrow. Can’t wait to see & eat this cheesecake!
I just had to tell you how wonderful it is the way you made your instructions…..I appreciate the measurements at each interval…..this kept me from having to scroll up and down a million times!! I made this tonight for a friend’s birthday at work so excited to taste it!!!! Thank you!!!
Yes I agree the ingredients with each strip was a huge help!!! Thank you!
I haven’t tasted it yet but it turned out really well. Looks professionally made. That’s not due to my baking skills but to your detailed recipe!
This cake is very time consuming and expensive but let me tell you. You get what you pay for and devote your time into. It is absolutely hands down delicious and me and my family loved it. I was told it looked like it came from a perfessional bakery. I appreciate so much how the instructions are laid out and the ingredients are right there each step along with pictures. This is now going into my top recipes. Thanks so much!!!
Hi! Can this be made into cheesecake bars?
It can! I also have a cookie dough cheesecake bars on my site too.
After 10 minutes of placing the beautiful cheesecake in the oven, I noticed 3 eggs on my counter that I forgot to add 😭😭I panicked, took the cheesecake out of the oven, whisked the eggs quickly, poured the cheesecake into the eggs and whisked again and all the cookie doughs and chocolate chips melted into the cheesecake 😭 I continued on with the cooking process. Not sure I want to be around when this cookie dough madness gets bit into🫣could be a failure, could be epic. TBD
How did it turn out??
Don’t think it gets any better than this! Cookie dough+ cheesecake=a winner
Oop forgot to add my stars ⭐️ ⭐️⭐️⭐️⭐️
I would like to make a smaller version of this – a 6″ cheesecake. Just a small cake for a few friends. Should I just cut the recipe in half, or take off one-third?
What do you recommend?
I would half the recipe!
I am hoping to make this with gluten free measure for measure flour. Have you ever tried not prebaking the cookie crust? I’m worried it would overbake if I did.
I strongly recommend prebaking the crust. Otherwise the crust could be soggy after baking, or raw in the middle. You can definitely use that gluten free flour though.
This cheesecake was amazing! It turned out beautifully; there were no cracks or anything. It also tasted sooo good — everyone loved it! Thank you for making the recipe so easy to follow, and for taking such beautiful photos of everything.
Fellow bakers, definitely use a strategy to remove the spiringform collar without it sticking – greasing it? A layer of parchment? Both? The cheese cake batter clings to the side without it, which sort of undoes any no-cracking effects from the water bath when the spring releases. 😕
Hello!
In my recipe, I mention you need to take baking nonstick spray and spray the springform pan. Then, line the bottom with parchment paper and spray again. This will let the cheesecake come right out of the pan!
Thank-you for the tip. She was talking about the sides of the cheesecake. Not the bottom. Unless your parchment was supposed to cover the sides as well?
So I spray the sides very well with the baking non stick spray (the kind with flour in it) and I don’t have a problem with it sticking.
Hi! Do you have any recommendations on how to get the bottom of the springform pan and parchment paper off without breaking the cheesecake?
So once the cheesecake is completely chilled, I simply turn the cheesecake over on its side and take off the parchment paper. I do this every time i make cheesecake (which is a lot!) and it won’t break it.
Instead of making the crust and cookie dough from scratch, can I just use a prepackaged cookie dough instead? everything is getting baked anyways so nothing would be raw.
Yes you can!
I had never tried to make a cheesecake before and it was my friend’s birthday so I decided to make her something. I know she likes chocolate chip cookie dough and cheesecake so I looked up some recipes and came across this one! I didn’t know cheesecakes are so time consuming to make. I said to myself I would not do this again. Then once it was ready, I brought it to my friend’s house, we ate it and oh my god it was the best thing I’ve ever made ever! I’m getting ready to make another one for my house since I couldn’t take hers because I made it for her for her birthday lol Im sure it won’t take me as long this time since I’ve made it already once this week. I’ll probably gain 20 lb this week but it will be worth it haha
Just seeking clarification, is the cheesecake filling baked on top of the cookie .. like together? or is the cheesecake made separately/water bathed/baked/cooled, then added to the cookie. i feel like i missed a step in the instructions. pls help
1. Bake the cookie.
2. Pour cheesecake batter on top of cookie crust (filled with 2/3rds of the cookie dough balls)
3. Bake in a water bath.
4. Chill
Hope this helps!
I was also confused about that. It seems baking the crust first and then another hour will make it hard.
So the cheesecake batter goes on top of the crust, so it stay soft even after baking for that long. If you don’t pre bake it, the crust won’t cook all the way.
Making this for my daughters birthday. Could I do it 2 days in advance and keep it in the fridge?
Yes you can! The only thing that needs to wait is the whipped cream. Otherwise you can make the cheesecake and top with chocolate after it chills ahead of time.
Awesome. Thank you. I’m making it today. I have so much cookie dough leftover after making a ton of the little dough balls. Any suggestions on another way to use it up?
Well 2/3rds of those cookie dough balls go into the cheesecake batter. Then, I top with extra cookie dough balls. The little extra I had over, I gave to my son to eat. Haha. You could also cut them even smaller and put it in ice cream!
Great idea, thanks!
Or dip the extra cookie dough balls into chocolate. Can you freeze the cheesecake and then thaw and add the cool whip topping?
Thank you!!
She could use stabilized whipped cream. That is what I am getting ready to do. My cheesecake is almost ready to emove from the oven to cool. I cannot wait to try it!
I hope you love it!
I made this for my birthday and it was delicious! Thank you for the fantastic recipe!
I have a 10 inch pan, will that work?
Yes, it will just make a more thinner cheesecake.
I followed this recipe exactly and let me tell you, it did NOT disappoint! Absolutely delectable and delicious!
My husband said, “Don’t think about it, just make it, it’s delicious!” We’ve made a number of cheesecakes and this one has become our favorite!
What temperature do you bake the cheesecake on?
I baked the cheesecake at 325F
The recipe doesn’t say to lower the temperature after baking the cookie crust. Could you update the printable recipe if it is supposed to be lowered?
You are right! I just changed it now.
This is without a single doubt the BEST cheesecake recipe I’ve ever used! My family and friends are obsessed with it and I love sharing it with my followers on Instagram. I wish I could demolish the whole thing on my own! If there was a sixth star I’d give it to this recipe!
Great recipe!! However, it should be noted flour is unsafe to eat raw and to heat treat flour for the edible cookie dough.
Heat treat the flour: spread a little more flour than needed out onto a parchment-lined rimmed baking sheet. Bake in preheated oven 300 degrees Fahrenheit for 7 minutes, or until flour temperature registers 160 degrees on an instant-read thermometer. Let cool completely before using or place in an air-tight container.
Sorry, is that 1100 calories per serving??!
Hello!
I went and took a look and updated it. It is 800 calories per serving. Which is a lot. It has a cookie crust, cheesecake, cookie dough balls in the middle, chocolate on top, whipped cream, and more cookie dough balls on top. It is worth every bite!
Hello. Is there a substitute for egg? Daughter has an egg allergy.
Seriously the entire family was obsessed!
Wow. I just had some of Stephanie’s chocolate chip crusted cheesecake. It’s delicious. A really nice crust. Very rich.
Hey What’s a replacement for sour cream in the recipe??
You can also use plain yogurt!