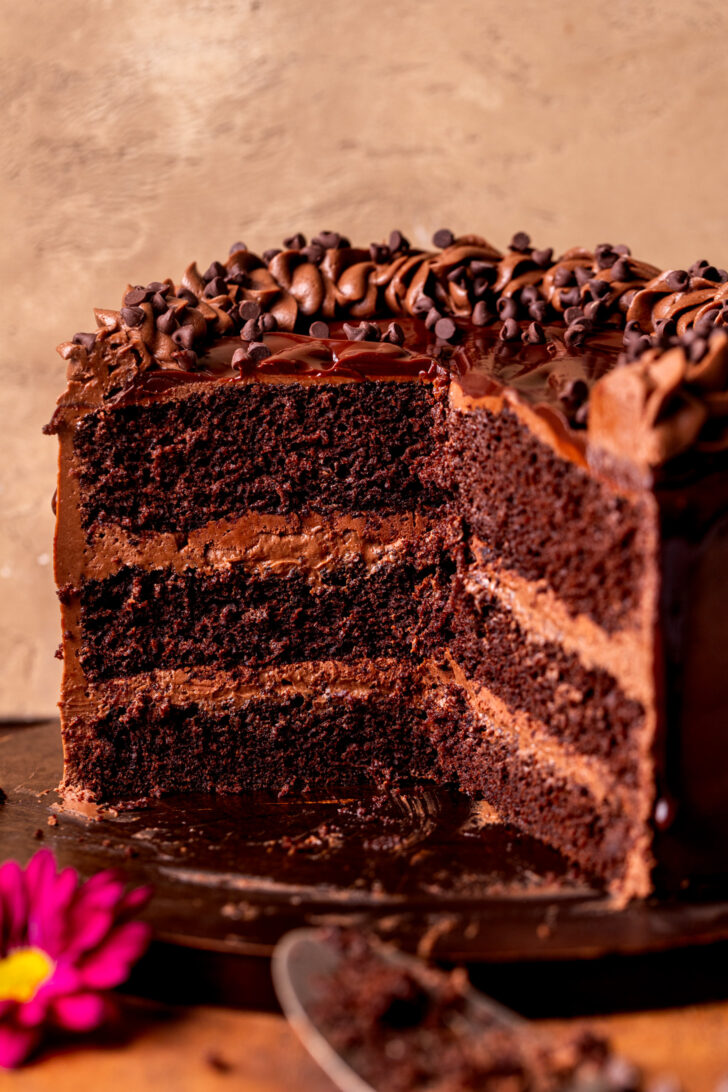
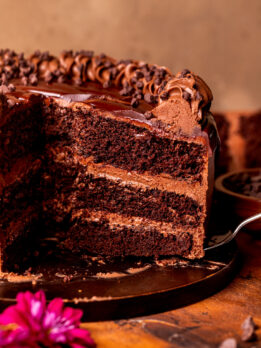
Moist Triple Chocolate Cake
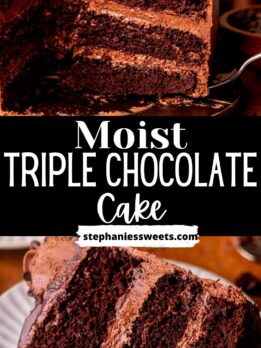
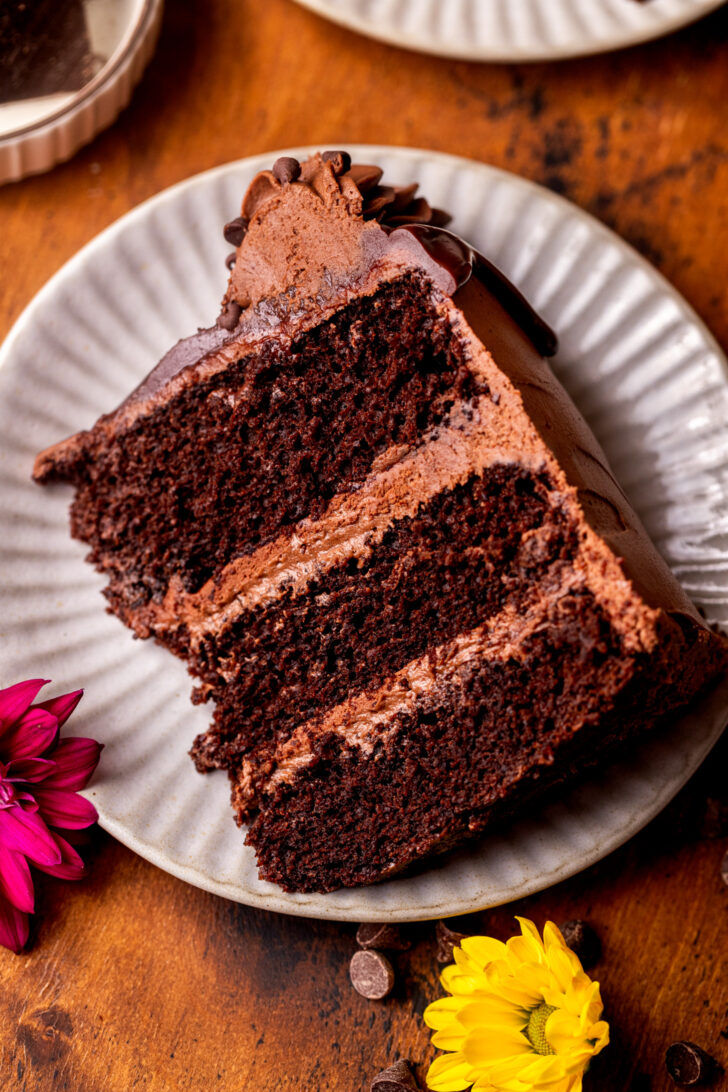
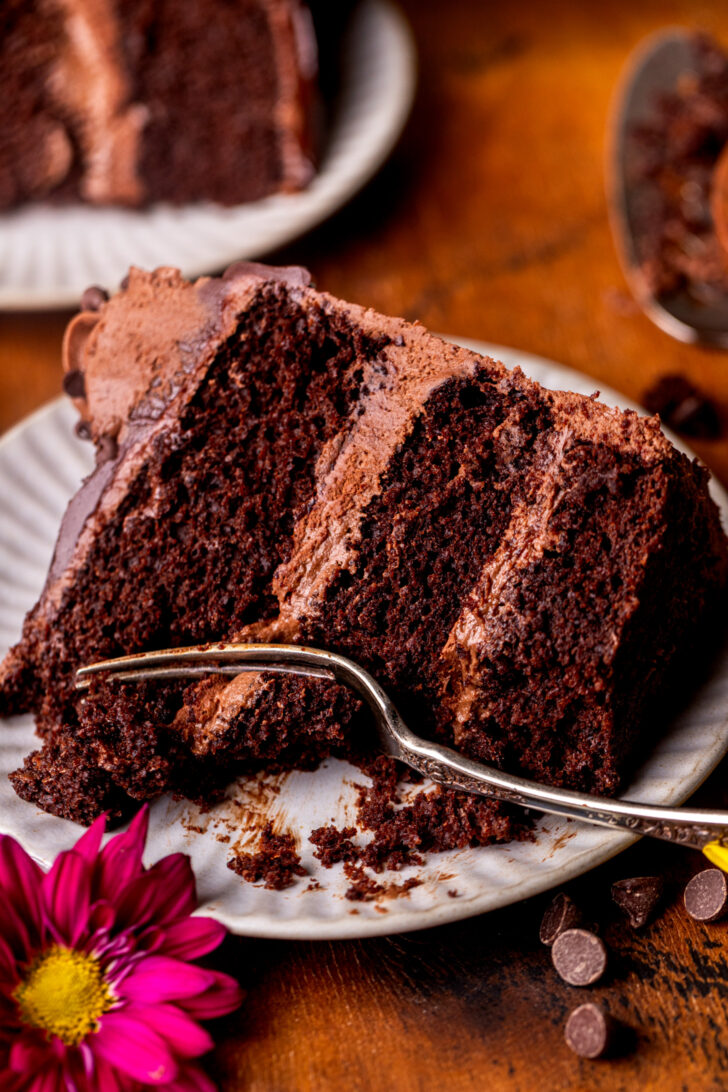
This moist triple chocolate cake is extremely chocolatey! It has three moist chocolate cake layers, whipped chocolate ganache for the filling, creamy chocolate cream cheese frosting, and a chocolate drip.
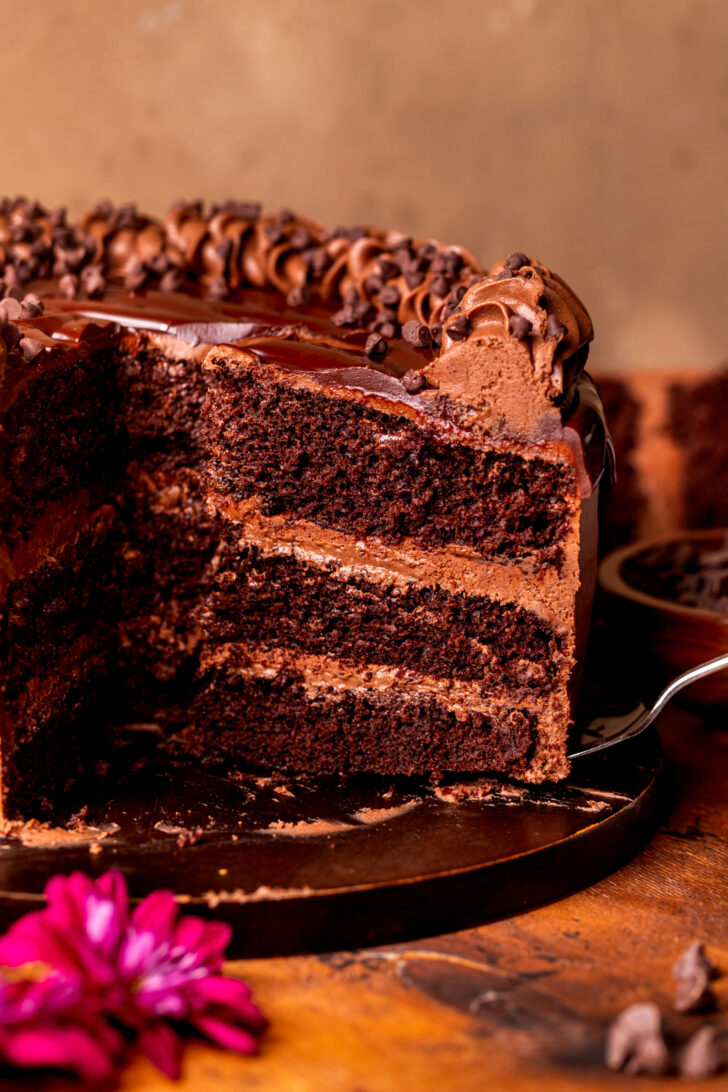
I wanted to create the most decadent chocolate cake. Kind of like the cake from Matilda. This is exactly this cake. This cake has really moist chocolate cake layers. Even when it is cold, it is still super soft. The whipped chocolate ganache really ups the chocolate flavor and the filling makes it so creamy. The chocolate cream cheese frosting is also super creamy, and plus the chocolate drip. It is just all the chocolate! Your friends and family will love this for their birthday!
I have tips and tricks and process photos to easily help you make this recipe! If you love chocolate desserts, you have to try my chocolate peanut butter filled cupcakes.
Tips for triple chocolate cake
Here are my tips, so yours turns out like this recipe!
- Tip 1: Don’t overpack your flour. If you stick your measuring cup into the flour, it will compact it down. This leads to more flour and a drier cake.
- Tip 2: Make sure to pull out your dairy ingredients 2 hours before using. To have cake batter and frosting that blends well, your ingredients need to be room temperature.
- Tip 3: Make your chocolate ganache for the filling an hour before you need it. You don’t want it to be too set, otherwise it won’t whip up
- Tip 4: Make your chocolate cream cheese frosting and the chocolate drip right before you need it. I also have a post all about how to make chocolate cream cheese frosting.

Assembling the cake

Save this Recipe!
For more chocolate cake recipes, try moist chocolate cake and brownie cake.
Make sure to leave a star review if you loved this recipe! Make sure to tag me on Instagram @stephaniesweettreats. To get more ideas follow me on Pinterest.
Moist Triple Chocolate Cake
Ingredients
Chocolate Cake
- 2 cups All-purpose flour
- 1 cup Unsweetened cocoa powder
- 1/4 cup Cornstarch
- 2 tsp Baking powder
- 1 tsp Baking soda
- 1 tsp Salt
- 1 cup Oil, Canola or Vegetable
- 1 3/4 cups White granulated sugar
- 1 tsp Pure vanilla extract
- 1 cup Buttermilk
- 4 Large eggs, room temperature
- 1 cup Hot water
Whipped Chocolate Ganache
- 1/2 cup Heavy cream
- 1 cup Semi-sweet chocolate chips
Chocolate Cream Cheese Frosting
- 2 cups Unsalted butter, room temperature
- 16 oz Cream cheese, room temperature
- 3 1/2 cups Powdered sugar, sifted
- 3/4 cup Unsweetened cocoa powder
- 1 tsp Pure vanilla extract
Chocolate Ganache Drip
- 1 cup Semi-sweet chocolate chips
- 3/4 cup Heavy cream
- Mini chocolate chips, for decorating
Instructions
Chocolate Cake
- Preheat the oven to 350℉. Spray three 8 inch cake pans with non stick baking spray. Line the bottom with parchment paper and spray again. Set aside.
- In a medium sized bowl, sift together flour, cocoa powder, cornstarch, baking soda, baking powder, and salt. Set aside.2 cups All-purpose flour, 1 cup Unsweetened cocoa powder, 1/4 cup Cornstarch, 2 tsp Baking powder, 1 tsp Baking soda, 1 tsp Salt
- In a saucepan, heat water until hot and steaming.1 cup Hot water
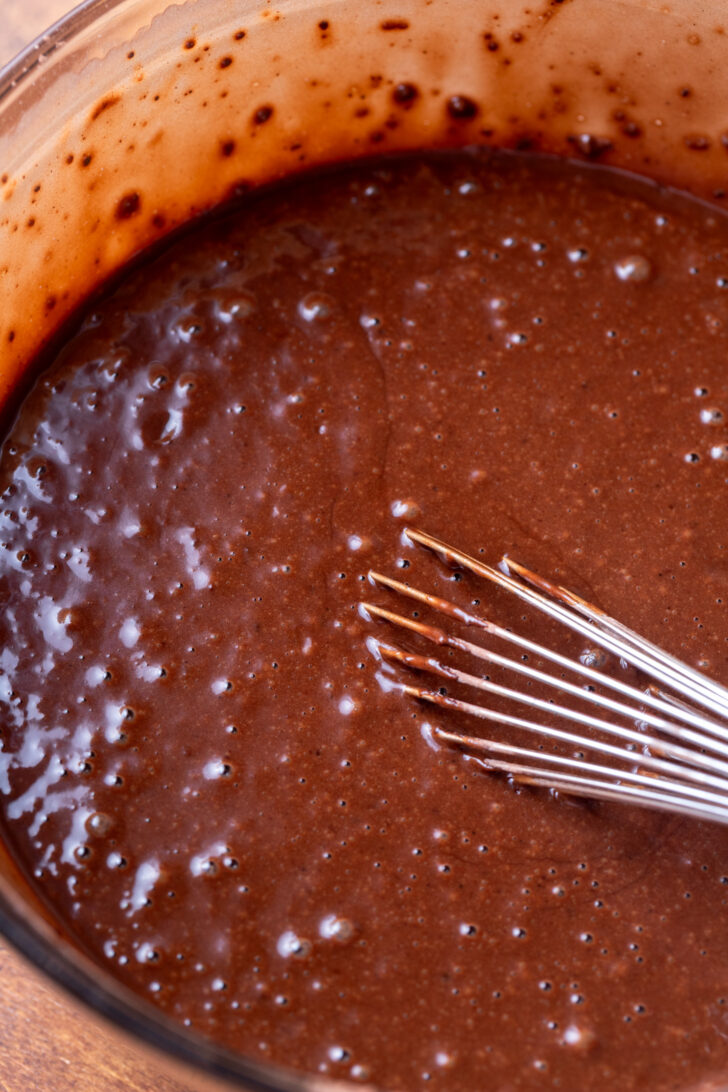
- In a mixing bowl, combine buttermilk, oil, vanilla, eggs, and sugar. Once it is all combined, slowly add in the hot water. Go slowly so you don't cook the eggs.1 cup Oil, 1 tsp Pure vanilla extract, 1 cup Buttermilk, 4 Large eggs, 1 3/4 cups White granulated sugar
- Add in the dry ingredients and mix until combined.
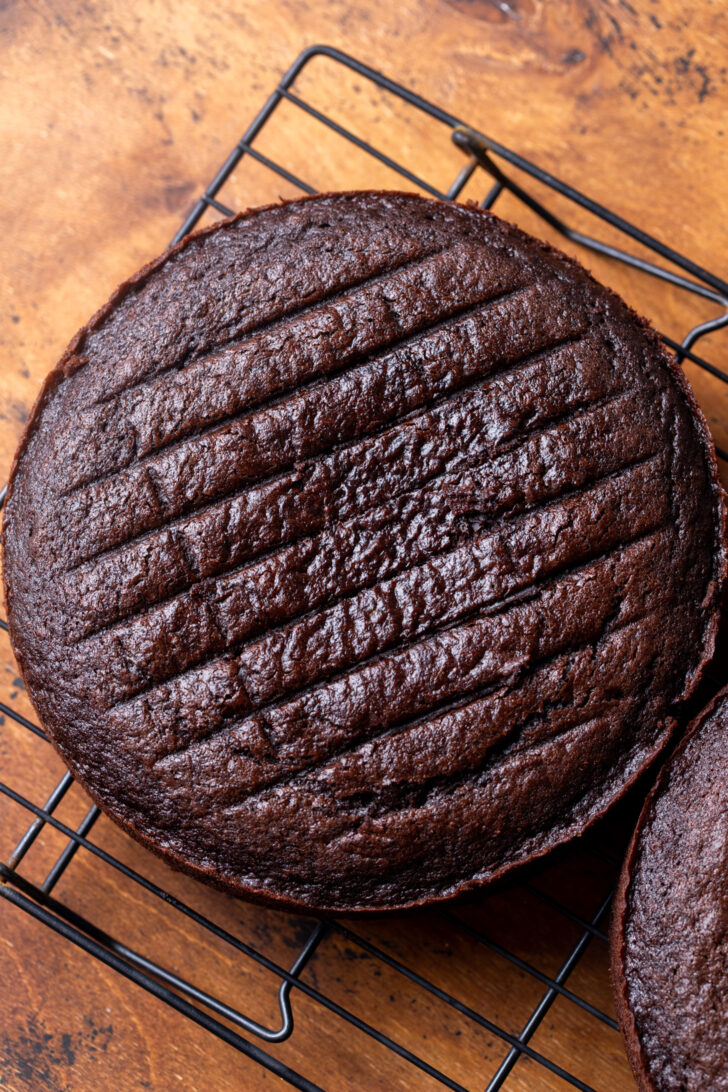
- Pour the cake batter into three pans evenly. Bake for 23-26 minutes. The cake is done baking when a toothpick inserted comes out clean.
- Let the cakes sit in the pans for 10 minutes before transferring to a cooling rack. Allow the cakes to cool completely before decorating.
Whipped Chocolate Ganache
- In a saucepan, heat heavy cream until hot and steaming. Pour hot cream over a bowl of the chocolate chips. Let it sit for 2 minutes1/2 cup Heavy cream, 1 cup Semi-sweet chocolate chips
- Use a rubber spatula to stir chocolate until smooth and glossy. If any chocolate chunks remain, heat in the microwave for 10 seconds and stir.
- Place bowl of chocolate ganache in the fridge for a total of 40-50 minutes. Every 10 minutes, take the bowl out and whisk it to keep it smooth. It should be a pudding like texture.
- Use a mixer, beat cooled chocolate ganache on medium-high for 20 seconds. It should get very light in color and become very fluffy. Only do this right before you are going to use it.
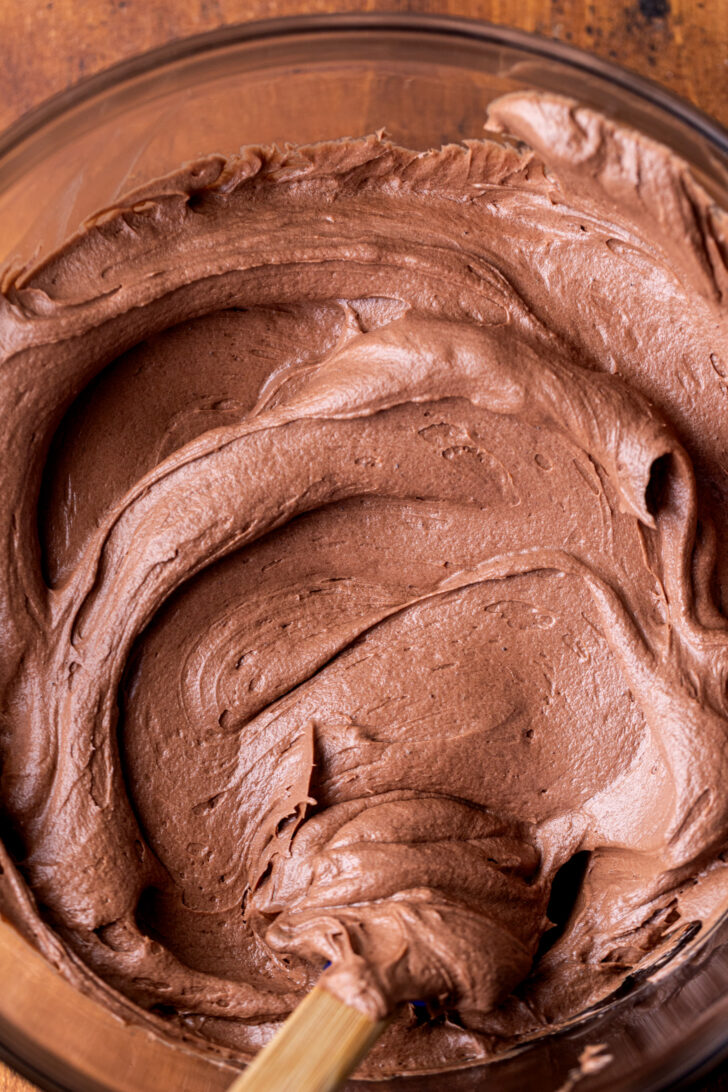
Chocolate Cream Cheese Frosting
- Make sure butter and cream cheese are room temperature. If the cream cheese is slightly cold, the frosting can split. Make this frosting right before you need it.
- In a large bowl, sift the powdered sugar and cocoa powder together. Set aside.3 1/2 cups Powdered sugar, 3/4 cup Unsweetened cocoa powder
- Using a mixer, beat butter on high speed for 2 minutes. Scrape the bowl using a baking rubber spatula. Add in the cream cheese and beat for 1 minute.16 oz Cream cheese, 2 cups Unsalted butter
- Add in half of the powdered sugar/cocoa powder, mix on low until just combined. Add in the rest of the powdered sugar and mix on low. Scrape the bowl.1 tsp Pure vanilla extract
- Add in the vanilla and beat on high speed until creamy.
Chocolate Ganache Drip
- In a saucepan, heat the heavy cream until hot and steaming. Pour hot cream over a bowl of chocolate chips. Let it sit for 2 minutes.3/4 cup Heavy cream, 1 cup Semi-sweet chocolate chips
- Stir the chocolate until it is smooth and glossy. If any chocolate chunks remain, heat in the microwave for 10 seconds and stir.
Assembly
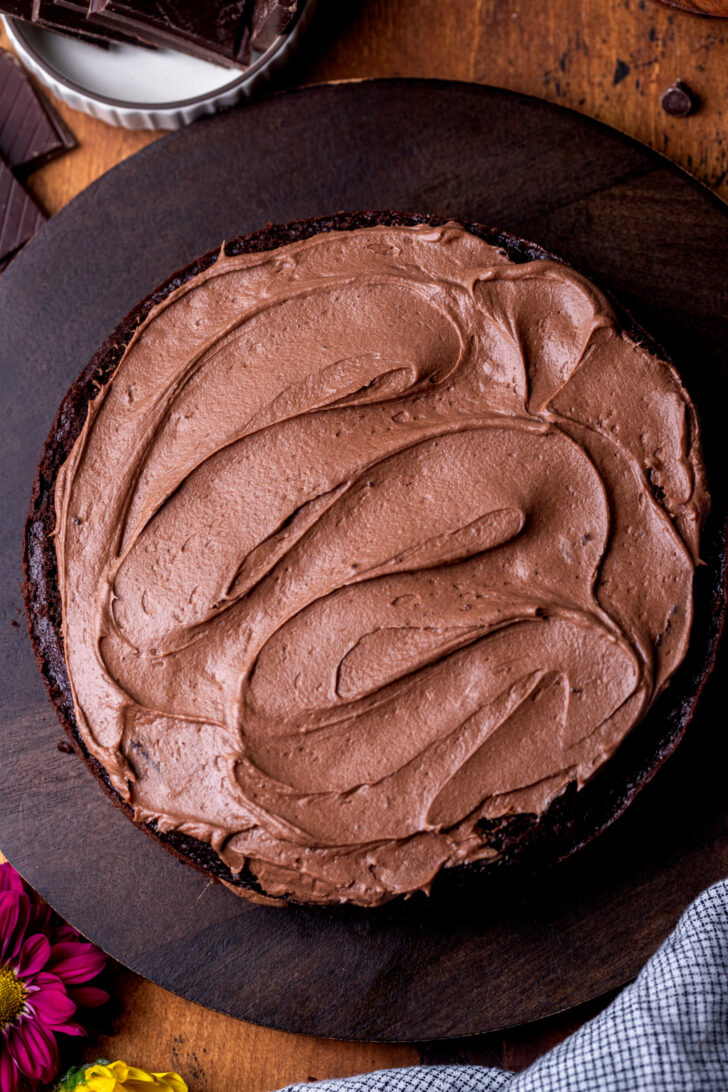
- Place a small amount of frosting the board you are decorating on. This will keep the cake in place. Use a serrated knife to cut off the tops of the cake, so they perfectly flat and even.
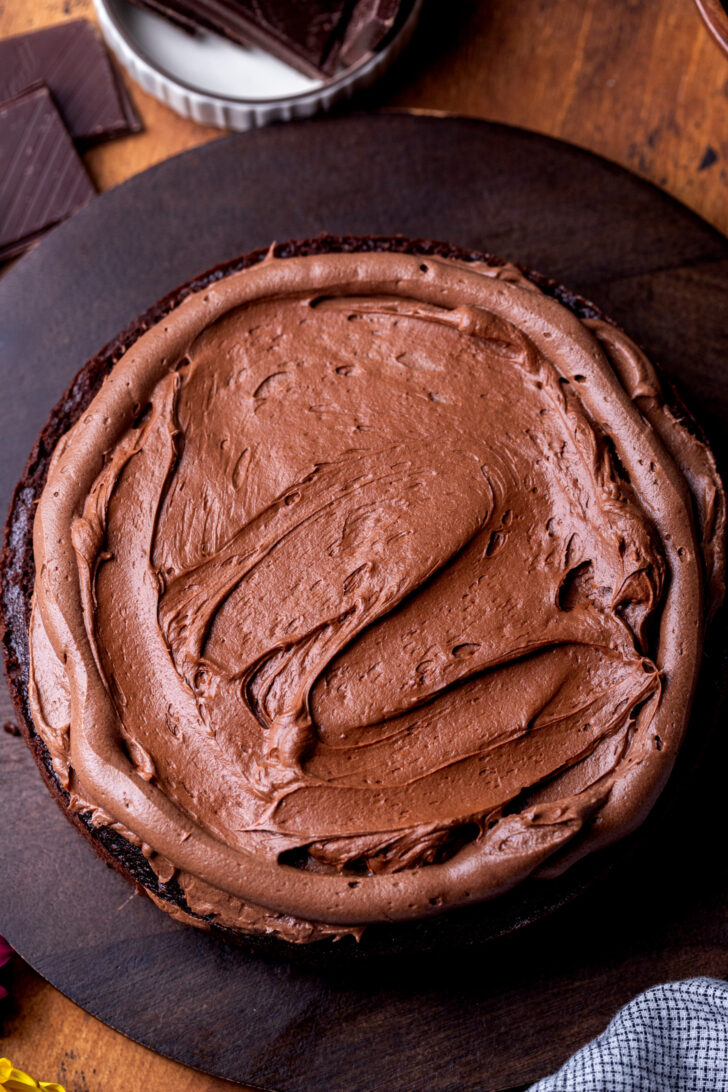
- Place the first layer of cake down. Spread a 1/2 cup of frosting over the cake. Pipe a border of chocolate frosting around the edge. Add half of the whipped ganache and spread evenly in the center.
- Repeat step 2 with the second cake layer.
- Place last layer of cake bottom side up. Frost the cake in a light layer of frosting. Freeze for 15 minutes to lock the crumbs in place.
- Frost the rest of the cake until smooth. Freeze for 10 minutes to set the frosting.
- Pour the chocolate ganache over the cake. Use an offset icing spatula to push some of the chocolate over the edge. Spread it smooth on top of the cake. Freeze cake for 10 minutes to set the drip.
- Optional: Pipe any frosting decoration on top of the cake. Decorate with mini chocolate chips.Mini chocolate chips
Hi im going to make this cake for a friend’s birthday. Does it have to be stored in the fridge or can it be kept sealed at room temperature.
It looks absolutely amazing
The only chocolate cake I can actually make without failing, love it!
This cake looks amazing Thanks for sharing. I have a 4 1/2 hour drive to our grand daughter’s birthday party. Will the assembled cake with icing be okay on the ride or can I freeze it after I ice the cake?
Thanks so much.
Rene’
This worked exactly as written, thanks!
Awesome recipe! I’ve used it twice already, and both times it came out delicious! I plan on using this recipe to make cupcakes tomorrow, and I see a previous reply that this recipe is applicable for cupcakes, but I am curious if the bake time would remain the same? And how much batter should be poured, half or three-quarters in a cupcake liner?
Fill it 2/3 full and bake. It will take 16-20 minutes.
Hello! I’ve used this recipe and it’s so good! I want to make it into 2 dozen mini cupcakes. Would half of the recipe be enough? How would I adjust temp and time? Thank you!
Yes it would be good of half! Temp is still 350F. Bake for 9-13 minutes.
I have made this recipe twice and it tastes AMAZING but my layers are very thin like an inch tall. What am I doing wrong?
This is so far a great recipe but I’m a bit stuck. The buttercream at some point began developing tiny bumps all over, not at all smooth. I sifted the powdered sugar and chocolate to ensure no lumps. It was very smooth at first. Maybe butter was too cold and as it became room temperature messed with the texture? help 😂
This worked exactly as written, thanks!
I made this recipe for our double date night and it was not only beautiful but it was delicious. Took it to church the next day for our group and everyone marveled over it. Then brought a slice back home where my husband and I fought for the last slice. It is very very rich so this cake goes a long way. It’s a keeper❣️
Delicious! I sure made a mess but it was worth it. Thank you for the great recipe, I am excited to try again in the future!
Only issue was my batter was quite liquidy and took twice as long to cook. I assume it’s something that I did wrong.
Does the 1x make 3 8″ rounds or is that for just one?
It makes three 8-inch cake pans.
Can you make this into cupcakes instead of cake? And do you know how many it would yield?
Yes you can! It will make 24 cupcakes. Half the recipe for 12 cupcakes.
Amazing recipe! Can I use the same amount milk chocolate instead of semi-sweet for the whipped chocolate ganache ?
Yes you can!
Just finished the cake for a chocolate loving friend. I could tell it is very moist. Instructions were very easy to follow.
The best, most moist chocolate cake. The instructions are extremely helpful, and it IS critical to chill the cake before frosting. It worked best for me to make the cake one day and the frosting and assembly the next. It;s a lot to do in one day. My only suggestion would be to downsize the buttercream.cream cheese frosting by 25%. I had way too much frosting left over. Wish I could post a picture—it was spectacular.
Can this cake be made with Splenda granules to replace the sugar?
No, I don’t recommended substituting with Splenda.
Whoa, chocolate! I wish I’d have cut down the cocoa powder in the frosting a little… but very good cake!
This cake turned out amazing! Was exactly as described, a moist triple chocolate cake. It’s also not too sweet.
I love how the recipes also include the weights of the ingredients throughout the instructions, so helpful.
OMG! I made this cake today and it is delicious! It also came out so much prettier than I expected! A lot of work but well worth it! Thank you for sharing 🥰. Chris in Texas
Stephanie: I don’t have 8″ pans so if I use two 9″ pans, what would be the cooking time suggested? I can’t wait to try this recipe!!!
It would be probably an extra few minutes of bake time because the batter will be thicker.
Thank you Stephanie! I actually decided to order 8″ pans from Amazon hoping it will be as beautiful as yours 🥰. I’m making it tomorrow for a family dinner on Sunday and can’t wait! Thank you for the very detailed instructions! Sincerely, Chris
Stephanie, thank you for sharing this amazing recipe!!!!! The step by step instructions and measurements under each made it so much easier, (I didn’t have to scroll back and forth. ) Thank u thank u thank u, I made this for my boyfriends 🎂 birthday. We will be having our tmrw night.
Fun, delicious, luxurious, chocolate lovers dream, thank u again for showing a step by step so someone like me can make this. 💋💋💋💋💋💋💋😘🥳🎂😋😍🥰
Love this recipe! Wondering if it is sturdy enough to double for a 4 layer 9inch cake for the bottom of a two tiered cake (4 6″ layers in top tier). Thanks for your help!
Hello,
in your recipe ingredients list you write that you use dark cocoa and said you use this one but it doesnt state which one you use after that.
I was thinking using dark dutch cocoa, black cocoa or a combination of regular, dutch and black.
Im always willing to try suggestions from bakers.
Thank you for a reply and for sharing this recipe and all the great tip replies you gave to others.
(*_*)
Chelle
My boyfriends birthday was the yesterday and he wanted me to make him a cake from scratch which i have NEVER done before. I’ve always just used boxed cake mix because its so much faster and less of a mess in my kitchen lol.. I don’t think i will do that again though. This was hands down on of THE BEST cakes I have ever made and usually i have turned away from chocolate cake/chocolate and have been leaning towards vanilla more. This recipe and the direction does not disappoint. Everyone LOVED this cake I made, in fact some people thought I bought it from the way it tasted and i decorated it to look exactly like the image she posted for it. My dads birthday is Saturday and we are celebrating tomorrow, i stuck the cake in a cake box, sealed it and popped it in the freezer to take leftovers to the celebration tomorrow. I did the original recipe but used 2 round 9in pans.
Hi Stephanie, just wondering – what’s the height of each 8 inch cake layer? I would like to make a tall-ish 8 inch cake so I’m wondering if I may need to double this recipe to achieve taller layers.
Each cake layer is 2 inches tall.
Made it for my sons birthday. I just used buttercream for the top and layers. But the chocolate cake recipe was soft, moist and delicious.
Hey how would I change the measurements if I used two 9 inch pans instead.
The measurements won’t change. It will make two thick cake layers too.
even the frosting and the filling will remain the same?
Yes it will since you are doing two layers, the filling and frosting doesn’t have to spread on three layers so there will be enough.
Thank you so much!
How would the measurements change if I used 2 9 inch pans instead?
The measurements will be the same. It will make two thick cake layers.
thank you!!!
Good morning,
This recipe looks beautiful and I’m making it soon. I just want to make certain 1 thing: ALL dairy products heavy cream, buttermilk and cream cheese need to be room temp?
Thank you so much!!
The dairy ingredients that say room temperature in the recipe, need to be pulled out.
Hi, I love the recipe! However I only have one pan. Is it possible to bake it all at once and later cut into three layers?
You can do that. If the cake pan is deep enough. For best results, you might want to just bake one cake layer at a time.
Amazing chocolate cake. I used the recipe to make part of a wedding cake sooo many compliments on such a good cake one of the best chocolate cakes I have had and directions were sooo easy to use. Definitely a keeper
I’m worried about the cream cheese buttercream. Won’t it be too soft for piping the decorations on the top? I’m wondering if I should do regular chocolate buttercream.
This recipe uses a lot of powdered sugar so it is stiff enough to pipe.
Can I use 6-3inch pans for this recipe? I have 4 of them that I was hoping you use instead of buying new pans. Thank you I’m advance!
Correction I meant to say “to” instead of you . So sorry.
Yes you can use those pans!
Due to the cream cheese frosting, does this cake have to stay refrigerated until ready to consume? Or can it stay out at room temp for a few hours?
It can stay out for a few hours. If you make it and serve it in 2 hours, it can stay out. A little trick I use is right before serving, I place the cake in the freezer for 10 minutes to set the frosting and makes it SO much easier to cut.
If are serving longer than 2 hours since you decorated. Place in the fridge. Then. pull the cake out for 1 hour before eating.
This is the first time I baked a cake with frosting and filling so your clear instructions and tips were extremely useful. I didn’t get to do the drip because I was too tired. 🙂 I used about half the frosting only and used dark chocolate chips for the filling. The cake was superbly delicious!!! My boys said it was the most delicious chocolate cake they have ever eaten. Thank you for building my confidence in baking cakes like this. Enjoying my last slice now.
This is so amazing! I am so happy you love this cake!!
Thank you so much this is a huge help! One last question- Will the frosting and ganache proportions be enough to accommodate the larger cake or do those need to be increased as well? I would be able to do those calculations myself, just not sure my Kitchen Aid bowl can accommodate 10 1/2 cups of powdered sugar!!
The ganache will need to be 1.5X. If you are not doing additional piping on top, then the frosting is good as it. If you are, I would 1.5X to have enough to decorate.
Is it possible to make this cake in 9 inch baking pans? I already have three of them but do not have 8 inch
It would be best in two 9 inch cake pans. Using three would make for very thin layers. You could also 1.5X the recipe to use three 9 inch cake pans.
I am making this for 18 people so the larger 9-in 3-layer cake would actually be better, but I’m definitely worried about calculating/measuring for the 1.5x increase
Use this recipe:
3 cups All-purpose flour
2 1/2 cups White granulated sugar
1 cup Unsweetened cocoa powder
3 tsp Baking soda
1 1/2 tsp Baking powder
1 1/2 tsp Salt
3/4 cup Oil Canola or Vegetable
2 tsp Pure vanilla extract
1 1/2 cup Buttermilk
4 Large eggs room temperature
1 1/2 cup Hot water
Loves the whipped buttercream recipe! Can’t wait to make this again…do yourself a favor and use the hersheys special dark cocoa. I really think it makes all the difference!
This recipe sounds delicious and I’m excited to try it! What size cake pans did you use?
I used three 8 inch cake pans!
I made it for my brother’s bday and everyone loved it
Great recipe and easy to follow. It was my first time making a layered cake.
I am about to make your delicious cake recipe! I would like to make the cream cheese frosting and the chocolate filing a day before assembling and consuming the cake. Will this provoke any problems to the texture of the cream?
You can make the frosting a day before. Keep covered and chilled in the fridge. Let it sit out for 1 1/2 hours. Then, re whip with your mixer. The filling needs to be made right before assembling the cake.
When making the whipped gsnache it was hard after the 2nd 10 minutes.. i used a mixer to get it whipped. Is that supposed to happen?
I am so sorry that happened! That means the chocolate got to cold. It could be your fridge is colder than mine. It is supposed to resemble chocolate frosting before whipping.
Looks so good. Can’t wait to try it!
This looks absolutely yummy! Can’t wait to try it!
Looks great! Thank you for sharing!
Can’t wait to try it. Just have a question about crumb coat. Where the crumbs come from? Lol I don’t see any direction about it 🙂
Hello!
So the crumb coat means that it is a light layer of frosting that will seal in the crumbs from the cake. That way the final layer of frosting will be clear of any crumbs!
[facepalm]
thank you! I’ve realized that after I left this comment haha. English is my second language, so I thought you actually put crumbs on top of the frosting lol
This was just chocolate perfection!!
Made this cake in about 3hrs 30 mins. The night before and kept it in the fridge overnight. Still amazingly moist and oh so chocolatey!!! It was a crowd pleaser! I will definitely be sharing and making it again. (Didn’t do drizzle, ran out of steam, but no one missed it) thank you for all the tips and tricks!!!
This is possible THE best chocolate cake I have ever had. I don’t think I will ever need another chocolate cake recipe again.
Delicious!
Such a lovely chocolate cake, thank you Stephanie!
Absolute dream chocolate cake!!
Fabulous moist and delicious.
I absolutely love this cake! It was so moist and delicious! Perfect for anyone who loves chocolate.
Hey great recipe. But can you suggest any substitute for eggs here as I don’t consume eggs but I absolutely love this recipe and wanna make it.
Can the batter be aside for a while? I have only 2 pans, so can it stay in a bowl?
Yes that is fine! Place cling wrap over the mixing bowl with the rest of the batter while the other cakes bake.
Is the bake time different if your making 6 inch cakes instead?
For 6 inch cakes, separate the batter into 4 pans. If you are baking all at the same time then the baking time should be the same. If you are baking 2 at a time for example, check on it around 15-16 minutes.
This recipe sounds delicious, but I have a few quick questions oil vs butter. My mom says always use butter for cakes. Of course you used oil. Do you think it makes a difference? Do you think that a butter/oil combination could be used? Lastly if I were to use butter would you recommend creaming the butter and sugar, then alternating wet and dry ingredients until it’s blended together?
Actually oil is a lot better in cake because it makes them more moist. I only use oil when I have a strong flavor that will mask the oil, like chocolate. I don’t recommend using butter or butter/ oil in this cake because it will completely change the texture of the cake. All of my white cakes uses a butter sugar creaming method because there is not a strong flavor to mask the oil. I strongly recommend trying this cake recipe with the oil, it creates a super moist cake!
This cake looks amazing. I was wondering if I could wrap the cake layers in plastic wrap and leave them out at room temperature for 2 days instead of freezing them.
Hey! I would like to make this cake for my sister’s upcoming birthday I was wondering if I could make the cakes 2 days in advanced and freeze it will it still be as moist ? And if so how long should I take out of the freezer to cool down and frost it ?
Yes you can absolutely do that! In fact every time I make cake, I will cover in cling wrap and freeze it. The photos you see here is a cake I froze 2 days before. Take the cake out of the freezer and onto the counter for 1 hour before decorating.
This looks awesome! Cant wait to make it for my family!
Thank you so much!
Hi. I plan to make your delicious looking cake on the weekend. I only have 9 inch pans. If I use 2 pans how long should I bake them for please? I can’t wait to try this recipe!!!
They probably need 30-35 minutes of bake time.
That is a work of art. Which I had the talent but I burn hard boiled eggs 😂
Thanks for sharing!
Thank you!